
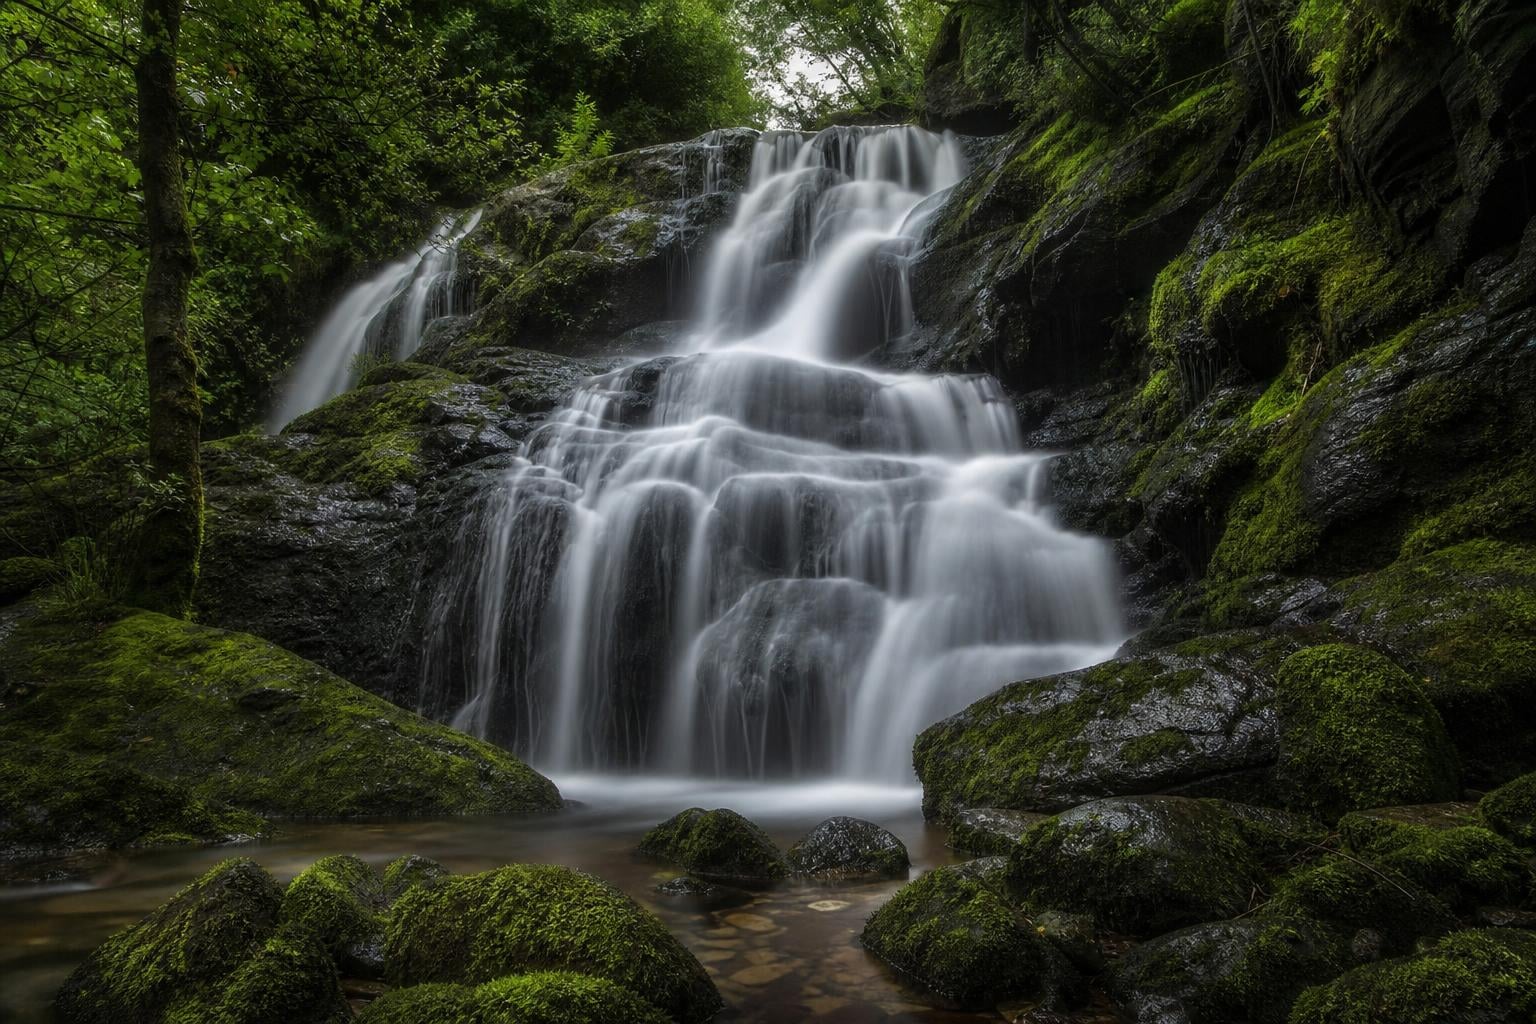
You have seen those breathtaking waterfall shots where the cascading water looks like flowing silk, soft and dreamy, wrapping around jagged rocks like a blanket of mist. But every time you point your camera at a waterfall, the water comes out looking frozen, choppy, and ordinary. If you are wondering why do my waterfall photos not have that silky smooth water effect, the answer comes down to one thing above all else: your shutter speed is too fast.
When your camera’s shutter opens and closes in a fraction of a second, it freezes the water mid-motion, capturing individual droplets and spray. The silky, smooth, milky effect you admire in professional waterfall photography happens when the shutter stays open much longer, allowing the moving water to blur across the camera’s sensor. That motion blur is what creates the dreamy, ethereal look.
I remember the first time I tried photographing a waterfall on a hiking trip. I pointed my camera, pressed the shutter, and got a perfectly sharp, perfectly boring photo. The water looked like someone had hit pause on a video. It took me months of experimenting and dozens of failed shots before I understood the combination of settings, gear, and technique that makes the magic happen.
In this guide, our team will walk you through exactly why your waterfall photos are not working and what to change. We will cover shutter speed, aperture, ISO, ND filters, tripods, and even how to pull off the effect on your phone. By the end, you will have a repeatable workflow you can use at every waterfall you visit.
Table of Contents
The Real Reason Your Waterfall Photos Look Frozen
Your waterfall photos look frozen because your shutter speed is too fast to capture motion blur. Most cameras default to shutter speeds between 1/60 and 1/500 of a second in auto mode. At those speeds, the shutter opens and closes before the water has time to travel meaningfully across the frame.
Think of it like this: if you blink quickly, you see a frozen instant. If you keep your eyes open for several seconds while watching water flow, your brain blends the movement into a continuous, smooth stream. Your camera works the same way. A fast shutter speed freezes. A slow shutter speed smooths.
Here is what happens at different shutter speeds when photographing a waterfall:
1/500 second: Water is completely frozen. Individual droplets are visible. This is what most beginners get by accident.
1/60 second: Water starts to show slight texture but still looks mostly frozen.
1/4 second: Water begins to look stringy and textured. Some smoothing is visible but it is not fully silky.
1 to 2 seconds: Water takes on that classic smooth, silky appearance. This is the sweet spot for most waterfalls.
5 to 30 seconds: Water becomes extremely smooth, almost fog-like. This works well for gentle cascades but can look overdone on powerful waterfalls.
The key insight is that silky water is not about your camera, your lens, or your editing software. It is purely about how long the shutter stays open. You can shoot a gorgeous silky waterfall on a 10-year-old entry-level DSLR if your settings are right. The effect is a physics trick, not a gear trick.
One photographer on the PentaxForums community made an excellent point: trying to use a formulaic approach to shutter speed is pointless because different waterfalls move at different speeds. A massive, roaring cascade at full flood needs only half a second to look silky. A gentle, low-flow trickle might need 10 seconds or more to smooth out. We will break down specific recommendations in the next section.
What Shutter Speed Do You Actually Need for Silky Water?
There is no single shutter speed that works for every waterfall. The right exposure time depends on how fast the water is moving, how much flow there is, and how smooth you want the final effect to look. Here is a practical breakdown you can use in the field:
Gentle streams and small cascades (low flow): These need longer exposures because the water is moving slowly. Start at 4 to 8 seconds and adjust from there. You may need 10 seconds or more to get a fully smooth look.
Medium waterfalls (moderate flow): A good starting point is 1 to 3 seconds. This typically produces the classic silky effect without over-smoothing the water.
Powerful, high-volume waterfalls: These are already moving fast and carrying a lot of water. You can often get a silky look at 1/4 to 1 second. Going much longer can make the water look like a solid white wall rather than flowing silk.
Ocean waves and surging water: For coastal scenes, 1/4 to 2 seconds creates a misty, ethereal look on receding waves. Longer exposures turn the ocean into flat fog.
Here is a quick reference for matching shutter speed to water type:
Low flow trickle: 8 to 15 seconds for full silk
Gentle stream: 4 to 8 seconds
Medium waterfall: 1 to 3 seconds
Powerful cascade: 1/4 to 1 second
Ocean waves: 1/4 to 2 seconds for mist
A Reddit user on the photography subreddit made a great observation about this: longer shutter speeds are not always better. Some photographers prefer keeping a bit of texture and detail in the water rather than smoothing it into a completely uniform haze. I personally prefer a 1 to 2 second exposure for most waterfalls because it smooths the water while preserving some natural flow patterns and texture.
One more thing to consider: your artistic vision matters here. There is no wrong answer. Some people love the ultra-smooth, 30-second exposure look. Others prefer a more natural rendering at 1 second. Experiment with different shutter speeds at the same waterfall and compare the results side by side.
The 5 Camera Settings You MUST Change for Silky Water
To get the silky water effect, you need to take your camera off auto mode and switch to Manual. Here are the five settings you must change, with specific values to start with:
1. Switch to Manual mode. Auto mode will never give you the silky water effect because the camera prioritizes fast shutter speeds to prevent blur. In Manual mode, you control shutter speed, aperture, and ISO independently. If Manual feels intimidating, start with Shutter Priority mode (Tv or S on your dial) and set a slow shutter speed. The camera will handle aperture for you.
2. Set a slow shutter speed. This is the single most important setting. Start between 1 and 2 seconds for a typical waterfall. Adjust based on the flow rate guidelines above. If the photo is too bright at these speeds, you will need to use other settings and filters to compensate.
3. Lower ISO to 100. ISO controls how sensitive your camera’s sensor is to light. A low ISO like 100 gives you the cleanest image with the least noise, and it also reduces the amount of light hitting the sensor, which helps you achieve longer shutter speeds. Never use auto ISO for waterfall photography. Set it manually to 100 or the lowest native ISO your camera offers.
4. Stop down your aperture to f/11 or f/16. A small aperture (higher f-number) does two things: it reduces the light entering the lens, allowing slower shutter speeds, and it gives you a deeper depth of field so more of your scene is in sharp focus. f/11 is a great starting point. You can go to f/16 or even f/22 if you need even slower shutter speeds, but be aware that image quality can degrade slightly at very small apertures due to diffraction.
5. Shoot in RAW format. RAW files contain far more image data than JPEGs, which gives you much more flexibility in post-processing. You can recover blown highlights in the water, adjust white balance, and enhance contrast without degrading image quality. If your camera supports it, always shoot RAW for waterfall photography.
Here is how these three settings work together. Shutter speed, aperture, and ISO form what photographers call the exposure triangle. For silky water, you want a long shutter speed, which lets in a lot of light. To prevent overexposure, you counterbalance with a low ISO (less sensitivity) and a small aperture (less light). If the scene is still too bright even with ISO 100 and f/16, that is when you need an ND filter.
Why You Need a Tripod (and How to Use One Properly)
A tripod is non-negotiable for silky water photography. When your shutter stays open for 1 to 10 seconds, even the tiniest camera movement will blur the entire image. Not just the water, but everything: the rocks, the trees, the sky. There is no way to stabilize a camera by hand for multiple seconds.
Even pressing the shutter button with your finger can introduce enough vibration to soften the image. This is why experienced waterfall photographers use one of the following:
Remote shutter release: A cable or wireless remote that lets you trigger the shutter without touching the camera.
Self-timer (2-second delay): Set your camera to a 2-second self-timer. Press the button, take your hands off, and the camera fires after any vibration has settled.
Smartphone app: Many modern cameras have companion apps that let you trigger the shutter from your phone.
If your camera has mirror lock-up or an electronic first curtain shutter, enable it. On DSLRs, the physical movement of the mirror flipping up creates a small vibration that can slightly blur your image at slow shutter speeds. Mirrorless cameras do not have this issue, but enabling the electronic shutter eliminates any remaining mechanical vibration.
When setting up your tripod near a waterfall, plant the legs firmly. Waterfall areas are often wet, rocky, and uneven. Extend the thickest leg sections first for maximum stability. Avoid extending the center column if possible, because a raised center column acts like a pendulum and amplifies vibration. Keep the tripod low and stable.
If you are standing in moving water, the current can vibrate your tripod legs. Plant each leg in a stable position between rocks. Some photographers bring waders or water shoes so they can position their tripod mid-stream for a more dramatic angle.
ND Filters: The Secret Weapon Most Beginners Skip
An ND filter, or neutral density filter, is a piece of dark glass that screws onto the front of your lens. It reduces the amount of light entering the camera without changing the color of the scene. Think of it as sunglasses for your camera.
Here is why ND filters matter: even with ISO 100 and f/16, a bright daylight scene may still overexpose at a 2-second shutter speed. Without a way to reduce light further, you simply cannot get a long enough exposure. An ND filter solves this problem by blocking several stops of light, letting you use shutter speeds of several seconds or more even in bright sun.
ND filters come in different strengths, measured in stops. Each stop halves the amount of light passing through:
3-stop ND (ND8): Good for overcast days or golden hour. Lets you extend shutter speed by a factor of 8.
6-stop ND (ND64): Versatile choice for cloudy to partly cloudy conditions. Extends shutter speed by a factor of 64.
10-stop ND (ND1000): The go-to for bright daylight. Reduces light by a factor of 1000, allowing very long exposures even in full sun.
Here is a practical guide for choosing ND filter strength based on lighting conditions:
Overcast or deep forest shade: You may not need an ND filter at all. ISO 100 and f/16 may give you enough shutter speed naturally.
Cloudy day: A 3-stop or 6-stop ND filter is usually sufficient.
Partly sunny / golden hour: A 6-stop ND filter handles most situations.
Bright midday sun: A 10-stop ND filter is essential for multi-second exposures.
Can you get the silky water effect without an ND filter? Yes, but only in certain conditions. If you shoot on an overcast day, in deep forest shade, during golden hour, or at blue hour, you may be able to achieve shutter speeds of 1 second or longer using just ISO 100 and f/16. The problem is that many waterfalls are in bright, open areas where this is not possible. This is why ND filters are considered essential gear for waterfall photographers.
One common mistake beginners make: after attaching an ND filter, they forget to recalculate their exposure. A 10-stop ND filter changes your exposure dramatically. The approach is to compose and focus without the filter, note your base exposure settings, then calculate the new shutter speed after attaching the filter. Many photographers use a smartphone app for this calculation. Alternatively, you can use your camera’s bulb mode and experiment with progressively longer exposures while checking the histogram.
Best Time of Day and Weather for Silky Water Photos
The ideal conditions for silky waterfall photography are overcast days, early morning, and late evening. Soft, diffused light means less light hitting your sensor, which allows longer shutter speeds without overexposure. Overcast skies also eliminate harsh shadows and blown highlights, giving you a more even, pleasing exposure.
Golden hour, the period shortly after sunrise or before sunset, is excellent for waterfall photography. The light is warm and low, and the reduced brightness helps you achieve slower shutter speeds. Blue hour, just before sunrise or after sunset, offers even less light and can produce very long exposures of 10 to 30 seconds.
Bright midday sun is the enemy of silky water photography. The intense light forces you to use faster shutter speeds or very strong ND filters. If you have no choice but to shoot at noon, a 10-stop ND filter is your best friend. Also look for waterfalls in deep forest canopies where the tree cover acts as a natural light diffuser.
Rain can actually be beneficial for waterfall photography. It increases water flow, makes rocks and foliage more saturated in color, and the cloud cover provides soft light. Just be careful to protect your camera from moisture. A light rain cover or even a plastic bag can save your gear.
Step-by-Step: Setting Up Your Shot for Silky Water
Here is the exact workflow I use every time I set up for a silky waterfall shot. Follow these steps in order:
Step 1: Scout your location and compose. Before touching any settings, find your composition. Look for interesting foreground elements like rocks, fallen logs, or pools of water. Consider where the water flows through the frame and use it as a leading line. Take a test shot in auto mode to check your framing.
Step 2: Mount your camera on a tripod. Set up your tripod on stable ground. If you are on wet rocks, make sure each leg is planted securely. Frame your composition precisely, because once you attach an ND filter, you will not want to move the camera.
Step 3: Switch to Manual mode and set base settings. Set ISO to 100, aperture to f/11, and dial in a shutter speed that gives you a proper exposure without any ND filter. Use your camera’s light meter and histogram to confirm the exposure is correct. You are looking for a balanced histogram that does not clip highlights or shadows.
Step 4: Focus carefully before attaching filters. Autofocus may struggle or fail entirely once a dark ND filter is on your lens. Focus now, while the lens can still see clearly. Use autofocus to lock focus on your subject, then switch the lens to manual focus to lock it in place. Alternatively, use Live View and magnify the image to focus manually for maximum precision.
Step 5: Calculate and attach your ND filter. If your base exposure is 1/60 second at f/11 and ISO 100, and you attach a 6-stop ND filter, your new shutter speed is 1/60 multiplied by 2 to the 6th power, which equals about 1 second. Use an ND filter calculator app or do the math yourself. Screw on the filter carefully without bumping the camera.
Step 6: Trigger the shutter without touching the camera. Use a remote shutter release, a 2-second self-timer, or your camera’s smartphone app. If your camera has mirror lock-up or electronic shutter mode, enable it now.
Step 7: Review the histogram and adjust. After your first shot, check the histogram on your camera’s LCD. If highlights are clipped, reduce the shutter speed. If the image is too dark, increase the shutter speed. Adjust in increments and reshoot until the histogram looks balanced.
Step 8: Experiment with different shutter speeds. Once you have a properly exposed shot, try longer and shorter exposures to see how the water changes. Take a shot at 1 second, 2 seconds, 4 seconds, and 8 seconds. Compare them later on your computer to find the look you prefer.
Common Mistakes That Ruin Silky Water Photos
Even after learning the right settings, beginners often make these mistakes that undermine their results. Here are the most common ones and how to fix them:
Mistake 1: Leaving ISO on Auto. Auto ISO will fight you. As you slow down the shutter speed, the camera may raise ISO to compensate, introducing noise and preventing proper exposure. Always set ISO manually to 100.
Mistake 2: Pressing the shutter button by hand. Even on a tripod, the physical act of pressing the button creates vibration. Use a remote, self-timer, or app every single time.
Mistake 3: Not using a tripod at all. Some beginners try to brace their camera against a rock or tree. This never works for multi-second exposures. A tripod is mandatory.
Mistake 4: Over-smoothing the water. Going from 1 second to 30 seconds does not always make the photo better. Extremely long exposures on powerful waterfalls can turn the water into a flat, featureless white blob. Less is often more.
Mistake 5: Forgetting to adjust settings after attaching an ND filter. This is extremely common. You attach the filter, forget to recalculate exposure, and end up with a completely black image or a blown-out mess. Always recalculate after adding or removing filters.
Mistake 6: Ignoring the histogram. Your camera’s LCD screen lies. It shows a brightened, contrast-boosted preview that can make an overexposed image look fine. Trust the histogram instead. If the graph is piled up against the right edge, your highlights are blown out.
Mistake 7: Not checking focus after changing settings. If you change aperture or attach a filter, your focus point might shift slightly. Always double-check focus before taking your final shot.
Mistake 8: Shooting only one exposure. Conditions change, water flow fluctuates, and you might not notice a problem until you review photos at home. Take multiple shots at different settings so you have options.
How to Fix the Wind Problem (Blurry Leaves and Trees)
This is the number one complaint I see in photography forums about waterfall photography. You get the water perfectly silky, but the wind was blowing during your 5-second exposure, and now the trees and leaves in the background are a blurry, smeary mess. The water looks great but the rest of the photo is ruined.
This happens because long exposures blur everything that moves, not just the water. Leaves fluttering in even a light breeze will blur just as much as the flowing water. The problem is that water is supposed to look smooth, but trees are not.
Here are several ways to solve the wind problem:
Shoot on calm days. The simplest solution is to wait for still air. Early morning, before the sun heats the air and creates thermals, is often the calmest time of day. Check the wind forecast before you go.
Use a shorter exposure. If the wind is light, you might be able to get away with a 1-second exposure instead of 5 seconds. The water will still look smooth, and the leaves will have less time to blur.
Take two exposures and blend them. This is the technique professional photographers use. Take one long exposure for the silky water, ignoring the blurry leaves. Then take a second, faster exposure to freeze the foliage. In Photoshop or Lightroom, blend the two images: silky water from the long exposure, sharp trees from the short exposure. This takes some practice with layer masks, but the results are worth it.
Frame your shot to minimize foliage. If blending is not an option, compose your shot so that moving trees and leaves occupy less of the frame. Focus on the rocks, the water, and the immediate foreground.
A commenter on the Photofocus blog described this exact frustration: the silky water looked beautiful, but the breeze made every leaf look like a watercolor smudge. The author’s recommendation was the two-exposure blending technique described above. It works because you are essentially taking the best part of each exposure and combining them.
Silky Water Photography on iPhone and Android
You do not need a professional camera to get the silky water effect. Modern smartphones have surprising capabilities for long exposure photography, though the approach is different.
On iPhone: The easiest method uses the built-in Live Photos feature. Open your camera app, enable Live Photos (the concentric circles icon at the top), and take a photo of the waterfall while holding your phone perfectly still. After capturing, open the photo in your Photos app, swipe up or tap the Live Photos badge, and select Long Exposure. Your phone blends the Live Photo frames into a simulated long exposure with smooth, silky water.
For more control, use a third-party app like Slow Shutter Cam or ProCamera. These apps let you manually set shutter speed and ISO on your iPhone, giving you results much closer to a dedicated camera. You will absolutely need a phone tripod or a stable resting place for these longer exposures.
On Android: Samsung phones with Expert RAW or the native Camera app’s Pro mode let you adjust shutter speed manually. Open Pro mode, set shutter speed to 1 second or longer, lower ISO, and use a tripod. Some Android phones also have a Long Exposure or Light Trail scene mode in the native camera app.
For both platforms, a phone tripod is essential. You cannot hold a phone steady for multiple seconds. Small, flexible tripods like the Joby Gorillapod work well because you can wrap them around rocks, branches, or fence posts near the waterfall.
One Samsung user on Reddit asked how to get the silky effect in daylight with an S20+. The challenge with phones is that they have small sensors and fixed apertures, so achieving long shutter speeds in bright conditions is difficult. The solution is to shoot during golden hour, on overcast days, or to use phone-compatible ND filter clips that attach over the lens.
Composition Tips to Make Silky Water Stand Out
Getting silky water is only half the battle. A photo with beautiful smooth water but a boring composition will still fall flat. Here are some composition techniques that pair well with long exposure waterfall photography:
Use the water as a leading line. Position yourself so the waterfall or stream draws the viewer’s eye through the frame. Diagonal lines are more dynamic than straight ones, so look for angles where the water flows from one corner toward the opposite side.
Include foreground elements. Rocks, logs, moss, and pools of water in the foreground add depth and give the viewer a sense of place. Get low and close to foreground objects to make them prominent.
Apply the rule of thirds. Place the main waterfall or focal point at one of the intersection points of the rule of thirds grid, rather than dead center. This creates a more dynamic and visually interesting composition.
Use a wide-angle lens. Wide-angle lenses (16mm to 28mm equivalent) exaggerate perspective, making waterfalls look more dramatic and giving you more foreground to work with. They also let you capture the full height of a tall waterfall in a single frame.
Post-Processing Tips to Enhance the Silky Effect
Post-processing is where good waterfall photos become great ones. Even with perfect in-camera technique, a few adjustments in Lightroom, Photoshop, or your preferred editor can significantly enhance the final image.
Adjust clarity and texture. Lowering clarity slightly can enhance the silky smoothness of the water. Conversely, increasing clarity and texture on the rocks and surrounding landscape adds crispness that contrasts beautifully with the soft water.
Manage highlights. Moving water often creates bright highlights that can look blown out. Use the highlight recovery slider to bring back detail in the brightest parts of the water. If shooting RAW, you have significant headroom for highlight recovery.
Enhance contrast. Silky water can sometimes look flat. Adding contrast helps separate the smooth water from the textured rocks and foliage. Use a curves adjustment for fine control.
Color grading. Water often takes on a greenish or bluish tint from reflected surroundings. Adjust the white balance and use the HSL panel to enhance or correct water color. Cooling the water slightly can give it a cleaner, more pristine look.
Blend exposures for wind. As mentioned earlier, if wind blurred your foliage, blend a sharp exposure of the trees with your silky water exposure. Use a layer mask in Photoshop to reveal the sharp trees where needed.
Enhance water color. If you want bluer water, start with a polarizing filter in the field. A circular polarizer reduces reflections on wet surfaces, allowing the natural color of the water and rocks to show through. In post-processing, use the HSL panel to boost blue and aqua tones. Be careful not to overdo it, as overly saturated water looks unnatural.
Safety Tips for Photographing Waterfalls
Waterfall environments are beautiful but hazardous. Wet rocks, slippery moss, fast-moving water, and unstable terrain all pose real risks. Here are some safety considerations every waterfall photographer should keep in mind:
Wear footwear with good grip. Hiking boots or trail shoes with aggressive tread are essential. Water shoes or waders with felt soles provide better grip on wet rocks. Many photographers slip on mossy rocks every year, and some incidents are serious.
Never cross fast-moving water that rises above your knees. Even shallow water can knock you off your feet if it is moving fast enough. If you need to cross a stream, look for the shallowest, slowest section.
Watch for falling rocks and debris, especially after heavy rain. Waterfalls erode their surroundings continuously, and loose rocks can fall without warning.
Protect your gear from spray. Waterfalls generate mist that can coat your lens and camera in water droplets. Bring a microfiber cloth and check your lens before every shot. Consider a rain cover for your camera in heavy spray conditions.
Let someone know where you are going. Many waterfalls are in remote locations with poor cell service. Carry a basic first aid kit and enough water and food for your trip.
FAQs
What shutter speed is needed for silky water?
The ideal shutter speed for silky water is between 1/4 second and 5 seconds, depending on the water flow rate. For medium waterfalls, start at 1 to 2 seconds. For gentle streams with low flow, use 4 to 8 seconds. For powerful cascades, 1/4 to 1 second is usually sufficient. The slower the water moves, the longer your shutter speed needs to be to achieve the silky effect.
What camera settings for waterfall photography?
For silky waterfall photos, use these settings: Manual mode, ISO 100, aperture between f/11 and f/16, and a shutter speed of 1 to 2 seconds as a starting point. Attach a tripod and use a remote shutter release or 2-second self-timer to prevent camera shake. Shoot in RAW format. If the scene is too bright, add an ND filter (6-stop for cloudy days, 10-stop for bright sunlight).
How to make waterfall pictures smooth on iPhone?
To create silky water on iPhone, enable Live Photos and take a photo while holding the phone perfectly still. Open the photo in the Photos app, swipe up, and select Long Exposure. The phone blends the Live Photo frames to simulate motion blur. For more control, use apps like Slow Shutter Cam or ProCamera with a phone tripod to manually set longer shutter speeds.
How to make water look bluer in photos?
To get bluer water in your photos, use a circular polarizing filter to reduce surface reflections and reveal the natural water color. In post-processing, adjust white balance slightly cooler and use the HSL panel to boost blue and aqua saturation. Shooting in RAW gives you maximum flexibility for color adjustments.
Can I get the silky water effect without a tripod?
No, you cannot reliably achieve the silky water effect without a tripod. The shutter speeds required (1 second or longer) make handholding impossible. Even bracing against a rock or tree will not provide enough stability for multi-second exposures. A tripod is mandatory equipment for waterfall photography. A remote shutter release or self-timer is also needed to prevent vibration from pressing the button.
Do I really need an ND filter for waterfall photos?
You need an ND filter if you are shooting in bright daylight or partly sunny conditions. Without one, the ambient light is too strong to allow shutter speeds slow enough for silky water, even at ISO 100 and f/16. On overcast days, in deep forest shade, or during golden and blue hour, you may achieve slow enough shutter speeds without an ND filter. A 6-stop or 10-stop ND filter is recommended for most waterfall photographers.
Conclusion
If you have been frustrated asking why do my waterfall photos not have that silky smooth water effect, the answer is now clear: your shutter speed is too fast. The silky, dreamy look comes from keeping the shutter open long enough for the moving water to blur across the sensor. Once you understand this core principle, everything else falls into place.
Switch to Manual mode. Set ISO to 100. Stop down to f/11 or f/16. Mount your camera on a tripod. Use a slow shutter speed of 1 to 2 seconds as your starting point. Add an ND filter if the scene is too bright. Focus before attaching the filter. Use a remote or self-timer. Check the histogram. Experiment with different shutter speeds to find your preferred look.
The silky water effect is one of the most rewarding techniques in landscape photography. Once you master it, every waterfall becomes a new creative opportunity. Grab your tripod, find a waterfall, and start shooting. The first time you see that smooth, flowing water on your camera screen, you will know exactly why it works.