
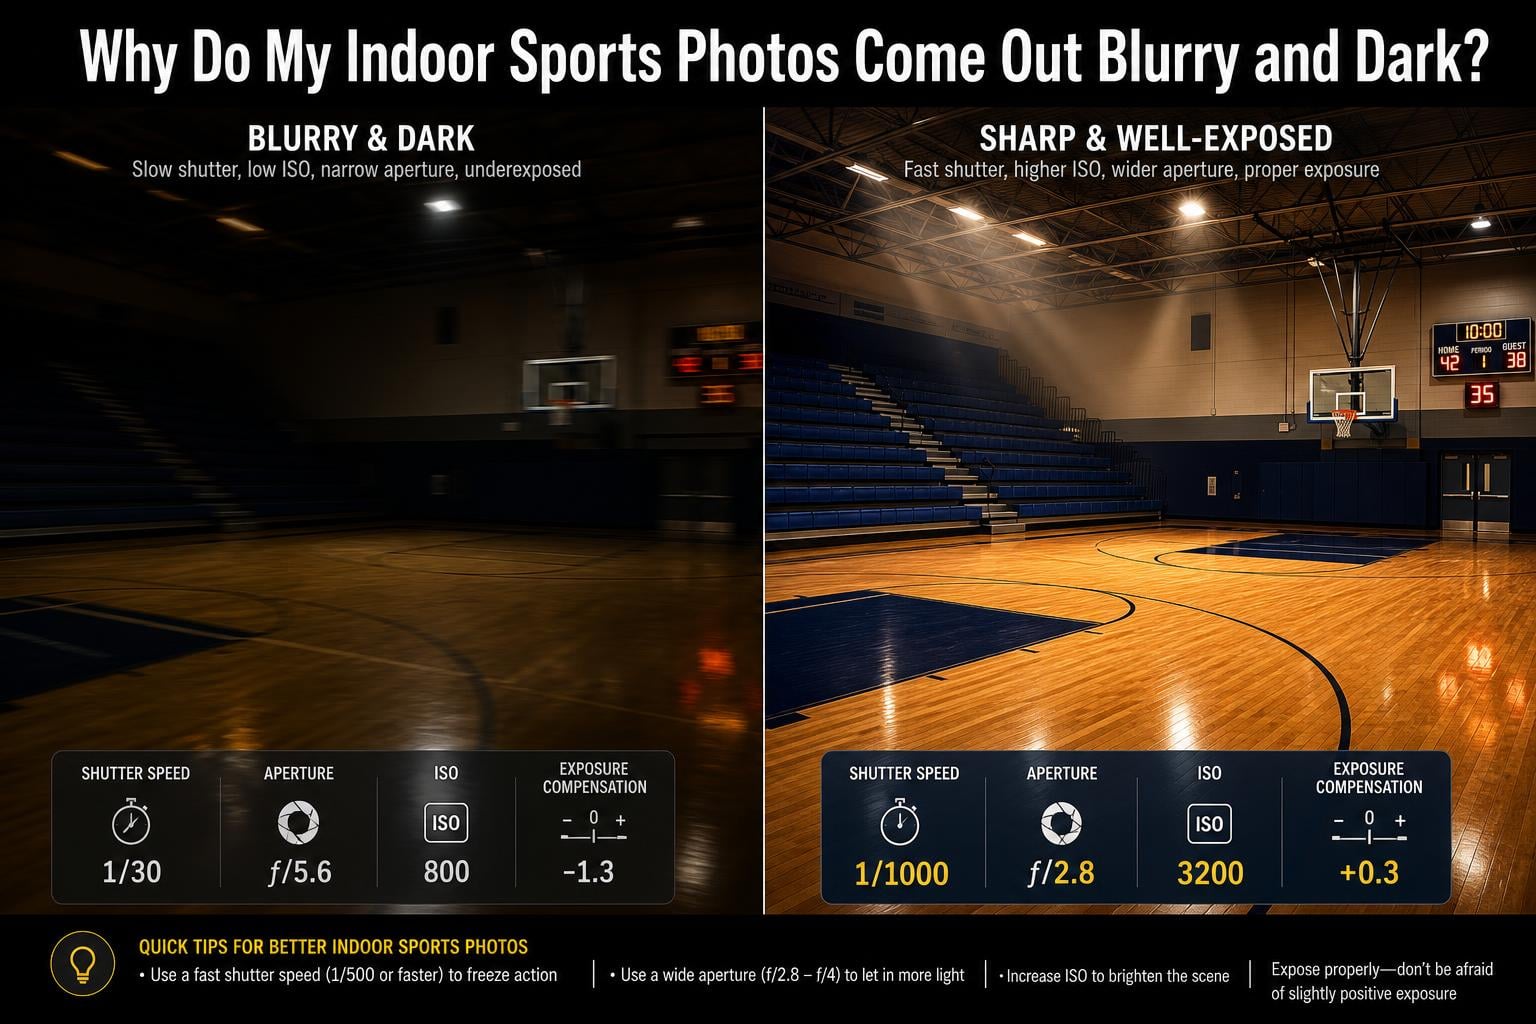
Indoor sports photos come out blurry and dark because gym lighting is far dimmer than daylight, so your camera cannot simultaneously use a fast enough shutter speed to freeze motion and a low enough ISO to keep images clean. The result is a trade-off: freeze the action and get a dark frame, or brighten the image and get motion blur or grain. Here is the quick fix: (1) set shutter speed to 1/1000s or faster, (2) open your aperture as wide as possible (f/2.8 or wider), (3) raise ISO to 3200-6400 without fear, (4) switch to continuous autofocus (AF-C or AI-Servo), and (5) shoot in burst mode to catch tack-sharp frames.
If you have ever sat in a gymnasium bleacher, pointed your camera at a basketball player driving to the hoop, and reviewed a photo that looked like a smudged painting, you are not alone. I have shot hundreds of indoor games across basketball, volleyball, and wrestling, and almost every photographer I know hit the same wall early on. The combination of fast movement and weak artificial lighting creates a problem that no single setting can solve.
The question why do my indoor sports photos come out blurry and dark is one of the most searched photography questions for a reason. It affects parents shooting their kids’ games, student yearbook photographers, and even experienced shooters who normally work outdoors. Indoor sports is arguably the single most demanding genre of photography for any camera and lens setup.
In this guide, I will break down exactly what goes wrong, why it happens, and the specific settings and techniques that fix it. By the end, you will understand the exposure triangle conflict at the heart of every blurry, dark gym photo and know exactly how to wrestle it under control.
Table of Contents
The Root Cause: Why Indoor Sports Is Photography’s Toughest Challenge?
Indoor sports photography forces you into a three-way tug of war called the exposure triangle, and all three sides work against you simultaneously. To freeze a sprinting athlete you need a fast shutter speed, which lets in less light. To keep the image bright you then need to widen the aperture or raise ISO. But indoor venues rarely have enough light to support fast shutter speeds at clean ISO settings, so something always gives.
Outdoor sports benefit from sunlight that is hundreds of times brighter than gym lighting. A typical outdoor soccer field at midday gives you around EV 15 (exposure value 15), while a well-lit high school gymnasium averages around EV 7 to EV 8. That is roughly a 250-times difference in available light. Your camera has to make up that gap somehow.
This is why indoor sports photography tips almost always come down to the same core advice: shoot wide open, raise ISO, and accept some noise. The problem is that each of those fixes introduces its own set of problems. High ISO adds grain and softens detail. Wide apertures reduce depth of field, making focus critical. And even then, the light may simply be too weak for the shutter speeds you need.
Different venues also vary enormously in brightness. A college basketball arena with broadcast-quality lighting might measure ISO 4000 at f/2.8 and 1/1000s, while a community center pool might require ISO 6400 at f/2.0 and 1/500s. I have shot in high school gyms where the light was so dim that ISO 12,800 at f/1.8 was barely enough. Knowing the venue matters as much as knowing your camera.
Why Your Indoor Sports Photos Are Blurry?
Blur in indoor sports photos comes from four main sources, and each one has a distinct cause and fix. Understanding which type of blur you are dealing with is the first step to eliminating it. Let’s break them down one by one.
Motion Blur: When Athletes Outrun Your Shutter?
Motion blur happens when your subject moves during the exposure. A basketball player sprinting at 15 mph covers about 6 inches in 1/100 of a second. At 1/250s, that becomes over a foot of movement. The result is a streaked, soft-looking athlete that no amount of sharpening can fix in post.
The fix is straightforward: use a faster shutter speed. For basketball and volleyball, 1/500s is the absolute minimum, and 1/1000s is recommended. For faster sports like indoor track or swimming starts, aim for 1/1250s or faster. Every doubling of shutter speed halves the motion blur, but it also halves the light reaching the sensor.
This is where the darkness problem starts. Crank your shutter speed to 1/1000s in a dimly lit gym, and you will immediately notice your photos getting dark unless you compensate with ISO or aperture. One Canon R10 user on the community forums described this perfectly: “When I used a higher shutter speed (1/1000) it was making the images very dark, and even bumping up ISO the image looked dark.” That is the exposure triangle fighting back.
Camera Shake: The Silent Image Killer
Even if your subject is relatively still, your own hands can introduce blur. Camera shake occurs when the photographer’s body movement shifts the camera during the exposure. At longer focal lengths (200mm and beyond), even tiny movements become visible because the magnification amplifies every twitch.
The old rule of thumb is that your shutter speed should be at least 1 divided by your focal length. Shooting at 200mm means you need at least 1/200s to avoid camera shake. But in indoor sports, you are already shooting at 1/500s or faster to freeze athletes, so camera shake is usually not the main culprit unless you are panning or using very long lenses.
If you are using a 70-200mm lens at the long end and your shutter speed drops below 1/200s, camera shake becomes a real factor. Image stabilization (VR, IS, or IBIS) can help here, but it only stabilizes the camera, not the subject. A stabilized photo of a blurred athlete is still a blurred athlete.
Autofocus Hunt: Why Your Camera Cannot Lock On?
Autofocus hunt is one of the most frustrating causes of blurry indoor sports photos. In low light and low contrast conditions, autofocus systems struggle to find edges to lock onto. The lens racks back and forth searching, and by the time it acquires focus, the moment is gone. The photo comes out soft or completely out of focus.
The solution is to switch your autofocus mode from single-shot (AF-S or One-Shot) to continuous tracking (AF-C or AI-Servo for Canon). In continuous mode, the camera constantly adjusts focus as the subject moves, which is essential for any sport with motion toward or away from the camera.
Your focus area mode matters just as much. For indoor sports, use a dynamic or tracking focus point rather than a single pinpoint AF point. A single point is too easily lost when the subject moves, and in low light the camera may struggle to find contrast on that tiny area. I recommend a small cluster of focus points or an expanded flexible spot so the camera has some room to track the athlete.
Pre-focusing is another technique that bypasses autofocus hunt entirely. If you know a volleyball player will jump at the net or a wrestler will shoot at a specific spot, focus on that location ahead of time and trigger the shutter when the action arrives. This technique is especially useful for sports with predictable positioning.
High ISO Softness: Noise That Looks Like Blur
Here is a trap that catches almost every photographer at some point. You raise ISO to brighten a dark gym photo, and the resulting image looks soft and mushy. You assume it is motion blur, so you increase shutter speed, which makes the image darker, so you raise ISO even more. The cycle continues until you have a grainy mess.
What you are actually seeing is digital noise from high ISO settings degrading image detail. When you amplify the sensor signal (which is what ISO does), you amplify both the image data and the electronic noise. At ISO 6400 and above on crop-sensor cameras, that noise starts eating fine details like facial features, jersey numbers, and textures. The image looks soft, but the real problem is noise, not motion blur.
One photographer on Reddit described this exact scenario: “Without flash it gave me horrible photos with huge grains, dark lights and motion blur.” The grain and the blur were compounding each other. The fix is not always more ISO. Sometimes it is a faster lens, a camera with better high ISO performance, or accepting some underexposure and recovering detail in post.
Mike Smith, a professional photographer who wrote extensively on this topic, argues that high ISO is actually the hidden culprit behind many blurry-looking photos even when the shutter speed was fast enough. His thesis is that photographers see soft images at 1/1000s and blame motion blur, when really the noise from ISO 6400 has destroyed the fine detail. Understanding this distinction changes your entire approach.
The Electronic First Curtain Shutter Problem
This is a lesser-known cause of blur that trips up many indoor sports photographers, and almost no mainstream article covers it properly. Many modern cameras default to an electronic first curtain shutter (EFCS) to reduce shutter shock and increase frame rates. EFCS uses an electronic signal to start the exposure and a mechanical curtain to end it.
The problem is that EFCS can create a characteristic banding or partial exposure distortion when shooting under artificial lighting, especially fluorescent and LED lights found in gyms. The lights flicker at 50 or 60 Hz, and if your shutter speed is not synchronized with that flicker, you get uneven exposure across the frame or strange horizontal bands.
One experienced photographer in a Facebook group nailed the diagnosis: “The most likely culprit is electronic first curtain shutter mode. If possible, switch to full mechanical.” If your photos have weird light bands or inconsistent exposure from frame to frame in the same gym, try switching to full mechanical shutter and see if the problem disappears.
Some cameras also offer an anti-flicker mode that detects the lighting frequency and times the shutter to fire at peak brightness. If your camera has this feature, turn it on for indoor sports. It can make a dramatic difference in exposure consistency.
Why Your Indoor Sports Photos Are Dark?
The darkness problem in indoor sports photography has its own set of causes, and they are just as important to understand as the blur causes. A photo can be razor sharp and still be unusable if it is too dark to see the athletes clearly. Let’s look at what makes indoor sports images underexposed.
Not Enough Light Reaching the Sensor
The most basic reason your indoor sports photos are dark is that there simply is not enough light in the venue. A high school gymnasium typically provides about 1/500th the illumination of midday sun. When you combine that low light level with the fast shutter speeds needed to freeze athletes, the sensor does not capture enough photons to produce a bright image.
This is the fundamental physics problem at the core of indoor sports photography. You cannot change how bright the gym is, and you cannot shoot at slow shutter speeds without introducing motion blur. So you are left with two levers: aperture and ISO. Opening your aperture wider lets in more light without affecting motion freeze. Raising ISO amplifies the signal after capture but introduces noise.
A Reddit user in the r/photography community summed up the frustration perfectly: “My photos are really dark in a very well lit space unless I up the ISO to 2500 or higher.” Even a gym that looks bright to the human eye is dim by camera standards. Your eyes adapt to low light continuously, but your sensor cannot.
Exposure Compensation Gone Wrong
Your camera’s light meter can be fooled by indoor sports scenes in ways that lead to underexposed photos. The meter tries to average the scene to medium gray, but a basketball court with dark jerseys, bright overhead lights, and a mixed-color crowd can confuse it badly. Dark uniforms fool the meter into thinking the scene is darker than it is, causing it to suggest settings that underexpose.
If you are shooting in aperture priority or shutter priority mode, check your exposure compensation setting. A negative compensation value will darken every image. Even at zero, the meter may still misjudge complex indoor scenes. The fix is to shoot in manual mode once you determine the correct exposure for the venue, or to dial in positive exposure compensation (+0.3 to +0.7) if your images are consistently coming out dark.
I always take a few test shots before the game starts and review them on the LCD with the histogram display turned on. Once I find the right combination of shutter speed, aperture, and ISO for that specific gym, I lock those settings in manual mode and shoot the entire game without changes. This eliminates metering surprises mid-game.
White Balance Making Photos Look Darker Than They Are
This is a problem almost no competitor article addresses, and it is a significant factor in how dark your indoor sports photos appear. Gymnasium lighting comes in various color temperatures, and the wrong white balance can make a properly exposed photo look muddy, dim, or sickly. If your white balance is set to daylight but the gym uses warm tungsten or greenish fluorescent lights, the resulting color cast can make the entire image look darker and less appealing.
The most common issue is a green or yellow tint from fluorescent and mercury vapor lights common in older gyms. This cast does not technically reduce exposure, but it makes skin tones look sallow and the overall image feel dim and lifeless. A photo with correct white balance will look brighter and cleaner even at the exact same exposure settings.
Set a custom white balance using a gray card in the gym, or shoot in RAW and adjust white balance later. Auto white balance often struggles with mixed lighting sources in indoor venues, producing inconsistent results from frame to frame. Consistent color temperature across all your shots also makes batch processing much faster.
Understanding the Histogram
The histogram is the most reliable tool for determining whether your indoor sports photos are actually dark or just look dark on the LCD. The camera’s LCD screen is notoriously inaccurate in bright environments, and a photo that looks well-exposed on the back of the camera may be severely underexposed when you view it on a computer.
A properly exposed indoor sports photo should have its histogram data clustered toward the center or slightly right of center, with no data piled up against the left edge (which indicates clipped shadows with no recoverable detail). If your histogram is bunched up against the left wall, your photo is underexposed regardless of how it looks on the LCD.
I recommend checking the histogram every few minutes during a game, especially if the gym has lights that cycle or dim. Some venues use LED lighting that pulses subtly, causing exposure to vary slightly from frame to frame. The histogram will reveal these fluctuations before they ruin an entire sequence of shots.
Camera Settings That Solve Both Problems
Now that we understand why indoor sports photos come out blurry and dark, let’s get into the specific settings that fix both problems at once. These are the exact values I use across different indoor sports, calibrated over years of shooting in gyms, pools, and arenas.
Shutter Speed: Freeze the Action
Shutter speed is your first priority for indoor sports. Set it based on the speed of the action, not the available light. It is better to have a noisy but sharp photo than a clean but blurry one. Noise can be reduced in post-processing, but motion blur cannot be fixed.
For basketball, volleyball, and wrestling, use 1/500s as the absolute minimum and aim for 1/1000s. For faster sports like indoor track, swimming starts, or gymnastics tumbling, go to 1/1250s or 1/1600s. If your camera cannot achieve those speeds at acceptable ISO levels, you need a faster lens or a venue with better lighting.
Start by setting your shutter speed in manual mode, then adjust aperture and ISO to match. This ensures motion blur is never the result of a setting compromise the camera makes automatically.
Aperture: Let In Maximum Light
Open your lens to its widest aperture for indoor sports. If you have an f/2.8 lens, shoot at f/2.8. If you have an f/4 lens, shoot at f/4 and accept that you will need higher ISO settings. The wider the aperture, the more light reaches the sensor, and the lower your ISO can be for any given shutter speed.
The trade-off with wide apertures is reduced depth of field. At f/2.8 and 200mm, your depth of field may be only a few inches. This means focus accuracy becomes absolutely critical. If the athlete’s eye is not in the plane of focus, the photo will look soft even at 1/1000s.
This is why continuous autofocus and the right focus area mode are so important. You need the camera tracking the subject constantly because there is almost no depth-of-field margin for error at wide apertures.
ISO: Raise It Without Fear
The biggest mindset shift for indoor sports photography is accepting high ISO as a fact of life. ISO 3200 to 6400 is completely normal for indoor sports, and modern cameras handle these settings well. Full-frame cameras can often push to ISO 12,800 and still produce usable images with some noise reduction applied.
The key is knowing your camera’s high ISO limits. Take test shots at ISO 3200, 6400, and 12,800 in your typical gym environment and review them at 100 percent zoom on a computer. Find the ISO level where noise becomes unacceptable, and treat that as your ceiling. Then set auto ISO with that ceiling in manual mode so the camera adjusts ISO automatically as lighting changes.
Crop-sensor cameras (APS-C and Micro Four Thirds) will hit their noise ceiling sooner than full-frame cameras. A Micro Four Thirds camera may start showing significant noise at ISO 3200, while a full-frame camera may remain clean up to ISO 6400 or beyond. This is where sensor size becomes a meaningful factor in indoor sports photography.
Autofocus Mode: Continuous Tracking
Switch your autofocus to continuous mode (AF-C on Nikon and Sony, AI-Servo on Canon). This tells the camera to keep adjusting focus as long as the shutter button is half-pressed, which is essential for tracking moving athletes. Never use single-shot autofocus for indoor sports.
For focus area, use a dynamic or expanded single point. This gives the camera a small cluster of AF points around your selected point, so if the subject shifts slightly within the cluster, the camera can still maintain focus. Avoid auto-area autofocus where the camera picks the subject itself, as it often locks onto the wrong player in crowded game situations.
Burst mode (continuous shooting) is your friend here. Set your camera to its highest continuous frame rate and shoot in short bursts of 3 to 5 frames as action peaks. This dramatically increases your chances of catching at least one frame where focus, exposure, and composition all align perfectly.
Recommended Settings by Sport Type
Different indoor sports require slightly different approaches based on the speed of movement, distance to the subject, and typical venue lighting. Here are my recommended starting settings for the most common indoor sports.
Basketball: Shutter speed 1/1000s, aperture f/2.8, ISO 3200-6400, 70-200mm lens. Focus on the player’s face or jersey number. Shoot from the baseline or sideline for the best angles. Basketball has frequent stoppages, so you can check and adjust settings between plays.
Volleyball: Shutter speed 1/800s to 1/1000s, aperture f/2.8, ISO 3200-6400, 70-200mm lens. Pre-focus on the net for blocks and attacks, then switch to tracking for digs and serves. Volleyball lighting varies more than basketball because many gyms light the court unevenly.
Gymnastics: Shutter speed 1/1250s or faster, aperture f/2.8 or wider, ISO 6400-12800, 85mm or 135mm prime lens. Gymnastics involves extremely fast rotational movement, so motion blur is a constant battle. Many gymnastics venues also prohibit flash, so high ISO is unavoidable.
Swimming: Shutter speed 1/1000s, aperture f/2.8, ISO 3200-6400, 70-200mm lens. Pool lighting is notoriously challenging because water reflects light unpredictably and the air above the pool is often dimmer than the pool deck. Watch your white balance carefully, as pool lighting often has a strong color cast.
Wrestling: Shutter speed 1/640s to 1/1000s, aperture f/2.8, ISO 2500-5000, 50mm or 85mm lens. Wrestling is closer and slower than basketball, so you can get away with slightly slower shutter speeds and lower ISO. Mat lighting is often more even than court lighting.
Indoor Track: Shutter speed 1/1250s or faster, aperture f/2.8 or wider, ISO 6400+, 70-200mm or longer. Runners move extremely fast, so shutter speed is the top priority. Indoor track facilities vary enormously in lighting quality, from well-lit college arenas to barely-lit community centers.
Equipment That Makes a Difference
Camera settings alone can only take you so far. The gear you use has a significant impact on your ability to capture sharp, well-exposed indoor sports photos. Here is how different equipment choices affect your results.
Sensor Size: Full Frame vs APS-C vs Micro Four Thirds
Sensor size is one of the most important factors in indoor sports photography because it directly affects high ISO performance. A larger sensor has larger individual pixels (photosites) that gather more light, producing cleaner images at high ISO settings. This means you can push ISO higher without unacceptable noise.
Full-frame sensors (found in cameras like the Canon R6, Nikon Z6, and Sony A7 series) are the gold standard for indoor sports. They typically deliver clean, usable images up to ISO 6400 or even 12,800. This gives you the freedom to use fast shutter speeds in dim gyms without worrying about noise destroying the image.
APS-C sensors (found in most consumer and enthusiast DSLRs and mirrorless cameras) are the middle ground. They perform well up to about ISO 3200 to 4000, after which noise becomes more visible. You can still shoot indoor sports with APS-C, but you have less margin for error. A Canon R10 user on the community forums described this exact struggle: indoor sports photos that were grainy and blurry because the crop sensor could not handle the high ISO needed.
Micro Four Thirds sensors (used by Olympus and Panasonic) are the smallest common format and face the biggest challenge in indoor sports. Noise becomes noticeable at lower ISO levels, typically around ISO 1600 to 2500. However, the system compensates with excellent in-body image stabilization and smaller, more affordable telephoto lenses. Some Micro Four Thirds photographers get great indoor sports results by using fast prime lenses and embracing noise reduction in post.
The crop factor of smaller sensors also affects your effective focal length. An APS-C sensor gives you a 1.5x crop (1.6x for Canon), turning a 70-200mm lens into a 105-300mm equivalent. This can be an advantage for reach, but it also means you need to be more careful about camera shake at longer effective focal lengths.
Fast Lenses: Why f/2.8 Matters
A fast lens is one with a wide maximum aperture, typically f/2.8 or wider. In indoor sports photography, the difference between an f/2.8 lens and an f/4 lens is enormous. That one stop of light means you can use half the ISO at the same shutter speed, which directly translates to cleaner images with less noise.
The 70-200mm f/2.8 lens is the workhorse of indoor sports photography for good reason. It provides the focal length range needed to shoot from the sidelines, the wide aperture needed for low light, and fast autofocus motors that keep up with action. Every major camera system has a high-quality 70-200mm f/2.8 option.
Prime lenses with even wider apertures (f/2.0, f/1.8, or f/1.4) let in even more light, but they lack zoom flexibility. An 85mm f/1.8 is excellent for wrestling, volleyball from the endline, or basketball from under the hoop. A 135mm f/2.0 is great for volleyball and gymnastics. The trade-off is that you cannot zoom to recompose, so positioning becomes more important.
If you cannot afford an f/2.8 zoom, consider an f/1.8 prime as a budget alternative. A 50mm f/1.8 lens costs a fraction of a 70-200mm f/2.8 but lets in twice as much light. You will need to move around more to frame your shots, but the image quality in low light can be surprisingly good.
Image Stabilization and Monopods
Image stabilization helps reduce camera shake but does nothing for subject motion blur. Optical stabilization in lenses (VR for Nikon, IS for Canon, OSS for Sony) and in-body image stabilization (IBIS) can let you shoot at slightly slower shutter speeds while maintaining sharpness from camera movement. However, for most indoor sports, your shutter speed is already fast enough that camera shake is not the primary issue.
Where stabilization helps most is with longer lenses in poorly lit venues where you are forced to drop shutter speed. If you are shooting at 1/320s with a 200mm lens because the gym is too dark for anything faster, stabilization can save you from camera shake blur. But remember, it will not freeze a sprinting athlete.
A monopod is an inexpensive and effective tool for indoor sports. It supports the weight of a heavy telephoto lens and reduces fatigue during long games. It also provides a more stable shooting platform than hand-holding, which helps with consistency across hundreds of frames. Many professional sports photographers use monopods for exactly these reasons.
Budget Alternatives to Pro Gear
Not everyone can afford a full-frame camera and an f/2.8 zoom lens. The good news is that you can still get decent indoor sports photos with budget gear if you understand the trade-offs and work within your equipment’s limits.
An entry-level APS-C camera with a 50mm f/1.8 lens can produce excellent basketball or wrestling photos from the right position. The wide aperture compensates for the smaller sensor’s high ISO limitations. You give up zoom flexibility, but a fast prime at a fraction of the cost of a pro zoom can deliver surprisingly clean results.
Older model full-frame cameras are another budget path. A used Canon 6D Mark II or Nikon D750 with an older 70-200mm f/2.8 lens can be assembled for a fraction of the cost of current pro gear and still deliver excellent indoor sports performance. Sensor technology has improved, but a few generations old full-frame sensor still outperforms a current APS-C sensor in low light.
The key insight from budget-conscious photographers on forums is this: invest in the lens before the camera body. A fast lens on an older camera body will always outperform a slow lens on the newest body for indoor sports. Light gathering capability matters more than megapixel count or autofocus sophistication when the venue is dim.
Common Mistakes Beginners Make
Beyond settings and gear, there are several common mistakes that plague indoor sports photographers. Avoiding these pitfalls will immediately improve your results without costing any money.
Relying on Sports Mode
The sports or action mode on your camera’s mode dial is a trap for indoor sports photography. It tries to select faster shutter speeds automatically, but it also makes decisions about ISO, autofocus, and exposure that are often wrong for dim gym lighting. The result is frequently dark, blurry images that are worse than what you would get in full manual control.
Sports mode typically keeps ISO too low because it prioritizes image quality over brightness. In a well-lit outdoor setting this is fine, but indoors it means underexposed photos. The autofocus in sports mode may also default to auto-area selection, which can lock onto the wrong subject in a crowded play. And the mode rarely accounts for the specific lighting flicker issues common in gymnasiums.
If you want to fix blurry and dark indoor sports photos, the first step is to stop using sports mode and learn to shoot in manual or semi-manual modes. Shutter priority with auto ISO is a good transition step, but full manual with auto ISO is where you ultimately want to be.
Shooting JPEG Instead of RAW
Shooting JPEG in indoor sports is like tying one hand behind your back. JPEG processing applies in-camera noise reduction, sharpening, and white balance adjustments that are baked into the file and cannot be undone. In low-light, high-ISO situations, the camera’s noise reduction often smears fine detail and the auto white balance frequently gets gym lighting colors wrong.
RAW files give you complete control over noise reduction, sharpening, exposure recovery, and white balance after the fact. You can recover up to two stops of underexposure from a RAW file with minimal quality loss, which is impossible with JPEG. For indoor sports where you are constantly pushing ISO and dealing with tricky lighting, RAW is non-negotiable.
The one downside of RAW is file size and buffer depth. RAW files are larger, which means your camera’s burst buffer fills faster, potentially limiting your continuous shooting rate. If this is an issue, invest in faster memory cards and be selective about when you shoot bursts.
Cropping Heavily After the Shot
Heavy cropping is a hidden killer of indoor sports image quality. When you crop a photo to 50 percent of its original area, you are effectively magnifying noise and blur by a factor of two. An image that looked acceptable at full resolution suddenly looks soft and grainy when cropped heavily.
This is a particular problem for photographers using shorter lenses who crop to simulate a longer focal length. A photo shot at 100mm and cropped to look like 200mm has half the resolution and twice the apparent noise of a photo genuinely shot at 200mm. One experienced photographer on Reddit gave this advice: “Make sure your picture is perfectly framed so that you don’t have to crop. If you crop 10 percent of the image, you lose quality.”
The solution is to get closer physically or use a longer lens. Position yourself at the baseline, endline, or sideline where the action comes to you. Use the longest lens you can afford. Frame tightly in-camera so you need minimal cropping later. Every pixel you keep matters when you are already dealing with high ISO noise.
Ignoring White Balance
As mentioned earlier, white balance issues can make properly exposed photos look dark and unappealing. Many beginners leave white balance on auto and accept whatever the camera produces. In gyms with fluorescent, mercury vapor, or LED lighting, this often results in green, yellow, or inconsistently colored images that look worse than they technically are.
Setting a custom white balance takes two minutes and dramatically improves the look of your indoor sports photos. Hold a gray card or white sheet of paper on the court under the venue lighting and set a custom white balance from that reading. If your camera does not support custom white balance, shoot in RAW and adjust later, but at least set a specific Kelvin temperature rather than leaving it on auto.
Quick-Fix Checklist Before Your Next Game
Here is a quick checklist you can run through before your next indoor sports shoot. These steps take about five minutes and address the most common causes of blurry, dark photos.
1. Set shutter speed to 1/1000s (or 1/500s minimum for slower sports).
2. Open aperture to its widest setting (f/2.8 or wider).
3. Set ISO to auto with a ceiling of 6400 (or your camera’s clean limit).
4. Switch to continuous autofocus (AF-C or AI-Servo).
5. Set focus area to a dynamic or expanded single point.
6. Switch to burst mode (high-speed continuous shooting).
7. Set RAW image quality.
8. Set a custom or preset white balance for the venue.
9. Turn on anti-flicker mode if your camera has it.
10. Switch to full mechanical shutter (disable electronic first curtain).
11. Take three test shots and review the histogram.
12. Adjust ISO manually if images are too dark or too bright.
Post-Processing Rescue: Saving Difficult Shots
Even with perfect settings, some indoor sports photos will need help in post-processing. Noise reduction, exposure recovery, and targeted sharpening can rescue images that look borderline on the LCD. The key is knowing what can and cannot be fixed.
Motion blur cannot be fixed in post. If the athlete moved during the exposure and created streaking, no amount of sharpening will restore that detail. Accept it and move on. This is why getting shutter speed right in-camera is so important.
Noise can be significantly reduced with modern noise reduction tools. Lightroom and Camera Raw both have excellent luminance and color noise reduction sliders that can clean up high ISO images dramatically. Third-party tools like Topaz DeNoise and DxO PureRAW use AI-based algorithms that often produce better results than the built-in tools. Apply noise reduction first, then add sharpening, so you are not sharpening noise.
Exposure recovery works well on RAW files that are up to two stops underexposed. Use the exposure slider in Lightroom to lift shadows, but watch for increased noise in the lifted areas. It is often better to lift exposure slightly and accept some noise than to leave an image too dark to use.
White balance is trivially easy to fix in RAW. Click the white balance eyedropper on a neutral gray area in the photo, and the entire color cast corrects instantly. This alone can transform a muddy-looking gym photo into a vibrant, clean image.
Targeted sharpening of faces and jersey numbers can make a soft photo look much crisper. Use a layer mask in Photoshop or the adjustment brush in Lightroom to apply extra sharpening only to the areas that matter most. This avoids amplifying noise in the background while making the subject pop.
FAQs
How to make sports photos less blurry?
To make sports photos less blurry, use a fast shutter speed of 1/1000s or faster for most sports. Switch to continuous autofocus mode (AF-C or AI-Servo) so the camera tracks moving subjects. Shoot in burst mode to increase your chances of capturing a sharp frame. Open your aperture wide (f/2.8 or wider) to let in maximum light, and raise ISO as needed to maintain your shutter speed. Using image stabilization or a monopod also helps reduce camera shake at longer focal lengths.
What is the best camera setting for indoor sports?
The best camera settings for indoor sports are: shutter speed 1/1000s or faster, aperture as wide as possible (f/2.8 or wider), ISO auto or set between 3200 and 6400 depending on your camera, continuous autofocus (AF-C or AI-Servo), and high-speed burst mode. Shoot in RAW for maximum recovery flexibility. For basketball and volleyball, start at 1/1000s, f/2.8, ISO 3200. For gymnastics and swimming, you may need 1/1250s and ISO 6400 or higher.
Why are my indoor photos dark?
Indoor photos are dark because indoor venues have far less light than daylight, often 200 to 500 times dimmer than midday sun. When you use a fast shutter speed to freeze motion, even less light reaches the sensor. The solution is to widen your aperture (lower f-number), raise your ISO, or both. Your camera’s light meter can also be fooled by dark uniforms and mixed lighting, causing underexposure even when settings seem correct.
Why are my pictures blurry in sports mode?
Sports mode struggles indoors because it often keeps ISO too low for dim gym lighting, resulting in underexposed or blurry photos. The autofocus in sports mode may not keep up with fast action in low contrast conditions, or it may lock onto the wrong subject. Sports mode also does not account for lighting flicker from fluorescent and LED gym lights, which can cause exposure inconsistencies. Switch to manual mode with auto ISO for much better control.
Conclusion
Understanding why your indoor sports photos come out blurry and dark comes down to one core conflict: indoor venues simply do not provide enough light for the fast shutter speeds that sports demand. Every solution involves a trade-off between shutter speed, aperture, ISO, and image quality. The photographers who get consistently sharp, well-exposed indoor sports photos are the ones who have learned to manage those trade-offs deliberately rather than letting the camera decide.
Start with the fundamentals: set shutter speed to 1/1000s, open your aperture to f/2.8 or wider, raise ISO to 3200-6400, switch to continuous autofocus, and shoot in RAW. Master those settings, then refine your approach based on the specific sport, venue, and equipment you are working with. Every gym is different, but the exposure triangle principles remain the same. The more you shoot indoors, the more intuitive these decisions become.