
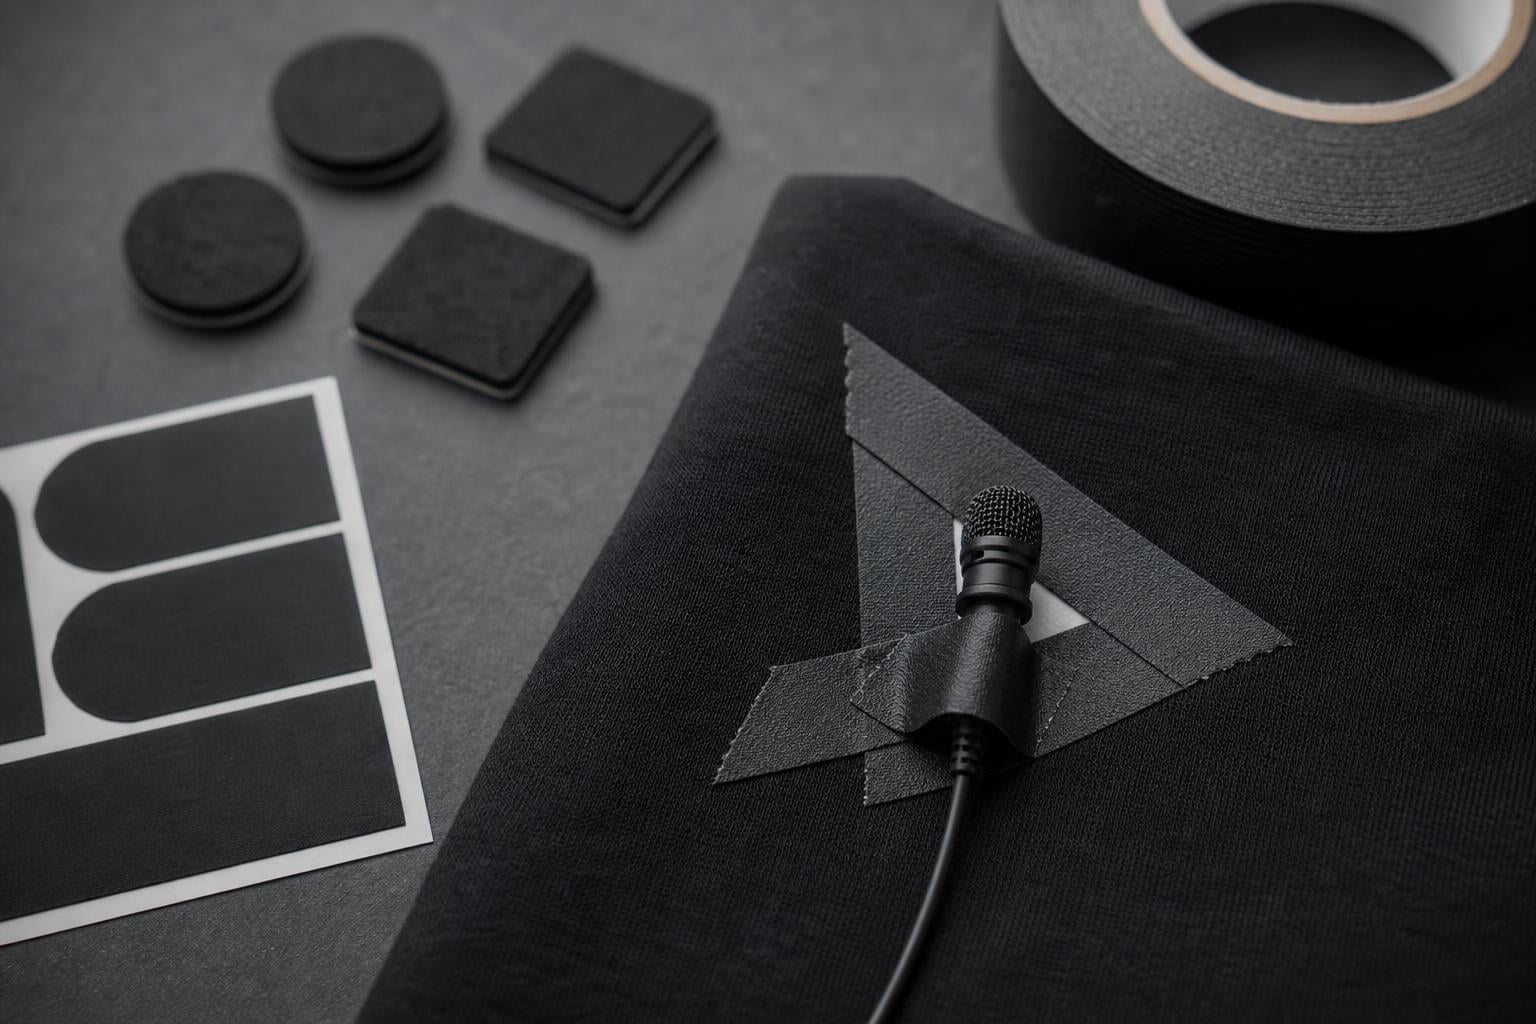
You set up the perfect shot. The lighting is beautiful, your talent is delivering their lines flawlessly, and everything feels right. Then you get to the edit room and discover that every word is buried under a constant crinkling, scratching, and rustling noise from the person’s shirt rubbing against the microphone.
If you have ever asked yourself why your lavalier mic picks up so much clothing rustle, the answer comes down to one simple fact: lavalier microphones use highly sensitive omnidirectional capsules that capture sound from every direction, including the microscopic friction of fabric fibers dragging across the mic housing. When cloth moves against the capsule, even slightly, the mic treats that movement the same way it treats a voice.
In this guide, our team breaks down exactly what causes lavalier mic clothing rustle, why some fabrics are far worse than others, and the specific techniques working professionals use to eliminate the problem on set. We cover the triangle method with gaffer tape, the moleskin sandwich technique, skin-versus-clothing placement, and what you can realistically fix in post-production.
Whether you are recording interviews, wedding films, corporate videos, or documentary footage, these solutions will save your audio.
Table of Contents
Why Does My Lavalier Mic Pick Up So Much Clothing Rustle?
The short answer is physics. Lavalier microphones are designed to be extraordinarily sensitive because they sit close to the chest, not near the mouth. To capture clear speech from that distance, manufacturers use omnidirectional condenser capsules with very high sensitivity ratings. That sensitivity is a double-edged sword.
When your talent moves, breathes, or gestures, their clothing shifts. Even a millimeter of fabric movement against the mic capsule creates mechanical vibration. The capsule converts that vibration into an electrical signal, and your recorder captures it as rustle noise. The mic cannot tell the difference between a voice and a polyester sleeve dragging across its surface.
The Physics of Fabric Friction on Mic Capsules
Every fabric has a surface texture made up of woven or knitted fibers. When two layers of fabric slide against each other, or when a single layer rubs against a hard object like a microphone capsule, those fibers catch, release, and vibrate. This produces acoustic energy in the frequency range that lavalier mics are most sensitive to.
The rustling sound you hear is actually hundreds of tiny friction events happening in rapid succession. Synthetic fabrics like polyester and nylon have stiff fibers that snap and pop when they move. Natural fabrics like cotton and wool have softer fibers that bend quietly, producing much less acoustic energy per movement.
This is why two identical mic placements can sound completely different depending on what the person is wearing. The microphone itself is not the problem. The interaction between fabric and capsule is.
Why Omnidirectional Capsules Make It Worse
Most professional lavalier microphones use omnidirectional pickup patterns. This means they capture sound equally from all directions around the capsule. A cardioid mic would reject sound from the sides and rear, but an omni picks up everything.
The reason manufacturers use omni capsules is that they deliver the most natural-sounding voice capture when hidden on the body. They also avoid proximity effect, which is the bass boost that happens when directional mics are placed close to a sound source. The trade-off is that omni mics cannot reject clothing noise the way a directional mic would.
Some specialized lavaliers use cardioid or hypercardioid patterns, but these require very precise aiming and are harder to conceal. For most applications, omnidirectional remains the standard, which means prevention is your best tool against rustle.
Microphone Sensitivity Ratings Matter
Sensitivity is measured in millivolts per pascal (mV/Pa) or as a negative decibel rating. A mic with a sensitivity of -30 dB will pick up more quiet detail than one rated at -40 dB. Higher sensitivity means the capsule converts even tiny vibrations into audible signal.
Expensive broadcast lavaliers like the DPA 6060 or Sanken COS-11D are extremely sensitive, which is wonderful for capturing natural dialogue but also means they capture every whisper of fabric contact. Budget mics with lower sensitivity may actually show less rustle in some situations, but they also produce thinner, less detailed voice audio.
Skin vs Clothing: Where Should You Place Your Lav Mic?
One of the most debated topics among sound mixers is whether to tape a lavalier mic directly to the performer’s skin or attach it to their clothing. Both approaches have advantages and drawbacks, and the right choice depends on the situation.
Taping to Skin: Pros and Cons
Placing the mic on skin eliminates fabric-on-capsule friction entirely. The microphone sits on a stable surface that does not rustle, crackle, or shift during normal movement. This is why many experienced sound mixers prefer skin placement for demanding shoots.
The downside is comfort and practicality. Medical tape or specialized adhesives can irritate sensitive skin, especially during long shoot days. Sweat can loosen the adhesive over time. And some talent simply will not agree to having a mic taped to their chest, particularly if they are wearing revealing wardrobe.
Skin placement also requires careful cable management. The wire running from the capsule to the transmitter pack must be secured along the body to prevent cable noise. This means using tape routes down the side of the torso and around the waistband, which takes time and practice to do well.
Taping to Clothing: Pros and Cons
Clothing placement is faster, more comfortable for talent, and works with almost any wardrobe. You can clip or tape the mic inside a shirt placket, behind a lapel, or under a collar in seconds. For corporate talking-head videos and quick interview setups, this is often the only practical option.
The risk is obvious: fabric moves, and when it does, it rustles against the capsule. A shirt that looks perfectly still to the eye can produce constant low-level friction noise that ruins dialogue. Button-down shirts are especially tricky because the placket area shifts every time the person breathes.
Our Recommendation
When you have time and talent cooperation, skin placement almost always produces cleaner audio. When speed matters or skin placement is not possible, clothing placement works fine as long as you use proper concealment techniques to isolate the capsule from moving fabric.
Many working professionals use a hybrid approach: they tape the mic to skin for critical dialogue scenes but switch to clothing mounting for B-roll and casual interviews where some rustle is acceptable.
The Triangle Method: The Most Reliable Taping Technique
If there is one technique that sound mixers recommend more than any other for eliminating clothing rustle, it is the triangle method. This approach creates a small, stable pocket around the microphone capsule so that fabric never touches the mic element directly.
What Is the Triangle Method?
The triangle method involves placing three small pieces of gaffer tape or medical tape in a triangular formation on the inside of the garment, with the microphone capsule sitting in the center of the triangle. The tape squares stick to the fabric and hold it taut, preventing the cloth from collapsing inward and contacting the capsule.
Think of it as building a tiny tent over the microphone. The fabric is anchored at three points, creating a stable dome that keeps the mic isolated. Even when the performer moves, the fabric cannot sag or rub against the capsule because the tape holds it in position.
Step-by-Step: How to Do the Triangle Method
Step 1: Cut three small squares of gaffer tape, each roughly one inch by one inch. White cloth medical tape works well for light-colored shirts, while black gaffer tape is better for dark wardrobe.
Step 2: Position the microphone capsule on the inside of the garment, roughly at sternum height and centered on the chest. Make sure the capsule is facing outward toward the mouth.
Step 3: Place the first tape square about half an inch above the capsule, sticky side facing the fabric. Press firmly to bond it to the cloth.
Step 4: Place the second and third tape squares below and to either side of the capsule, forming a triangle. Each piece of tape should be close enough to the mic that the fabric between them stays taut but not so close that tape covers the capsule opening.
Step 5: Gently test the setup by having your talent move their arms, twist their torso, and lean forward. Listen through headphones for any rustle. If you hear noise, adjust the tape positions until the fabric is fully isolated from the capsule.
Step 6: Run the mic cable along the inside seam of the shirt and secure it with an additional tape square. This prevents cable movement from generating noise that travels up to the capsule.
Materials You Need
The triangle method works with almost any tape, but professionals typically use cloth medical tape (like 3M Micropore) or 1-inch gaffer tape. Avoid duct tape, electrical tape, or any adhesive that leaves residue on wardrobe. Costume departments will not forgive you.
Some sound mixers also keep pre-cut moleskin pads in their kits. Moleskin has a soft fabric top and an adhesive backing, which makes it ideal for creating a cushioned surface that further reduces friction.
Best Fabrics for Lavalier Microphone Recording
The single biggest factor in clothing rustle is the fabric itself. You can use the best taping technique in the world, but if your talent is wearing a stiff polyester shirt, you will still get noise. Understanding which fabrics are quiet and which are noisy gives you a powerful advantage.
Natural Fabrics: Your Best Friends
Cotton is the gold standard for lavalier recording. Soft cotton t-shirts, button-downs, and knit tops produce minimal friction because the fibers are flexible and quiet. When cotton rubs against something, the fibers bend and compress rather than snapping against the surface.
Wool is another excellent choice, particularly fine merino wool. The fibers are soft and dense, which means they move smoothly against surfaces without catching. Wool also drapes well, which reduces the amount of fabric movement near the mic.
Linen is more of a mixed bag. While it is a natural fiber, linen tends to be stiff and structured, especially when new. Heavily starched linen can produce significant noise. Softened, well-worn linen is usually fine.
Synthetic Fabrics: The Enemy of Clean Audio
Polyester is the worst offender. It is stiff, it has a hard surface texture, and it generates significant static electricity that can even cause electronic interference with some wireless systems. Polyester dress shirts, blazers, and athletic wear are notorious for producing rustle that is nearly impossible to eliminate through taping alone.
Nylon and acrylic are similarly problematic. These materials have rigid fibers that create sharp, percussive sounds when they move. A nylon windbreaker or an acrylic sweater will generate noise with every arm movement.
Blended fabrics fall somewhere in between. A cotton-poly blend will produce less noise than pure polyester but more than pure cotton. The higher the synthetic percentage, the more rustle you can expect.
Fabric Noise Ranking: Quiet to Loud
Based on field experience, here is how common wardrobe fabrics rank from quietest to loudest for lavalier microphone recording:
1. Cotton knit (t-shirt material) – very quiet
2. Merino wool – very quiet
3. Cotton weave (oxford shirt) – quiet
4. Silk – moderate, can be slippery
5. Cashmere – moderate
6. Cotton-poly blend – moderate to loud
7. Denim – loud when stiff, quieter when broken in
8. Leather – loud, creaks with movement
9. Polyester – loud, stiff fibers snap
10. Nylon – very loud, crinkles constantly
11. Acrylic – very loud, similar to nylon
Talent Wardrobe Preparation Checklist
When you have any control over wardrobe, give your talent or their stylist a quick checklist:
– Bring natural fabric options (cotton, wool, merino)
– Avoid polyester, nylon, and acrylic whenever possible
– Choose garments with some drape rather than stiff, structured pieces
– Bring an undershirt if possible to create a skin-contact layer
– Avoid heavy jewelry that clinks against the mic area
– If wearing a button-down, choose one that fits well so the placket does not gap
– Avoid brand-new, unwashed clothing which is stiffer and noisier
Communicating these preferences before the shoot day saves enormous time on set. A quick email to the wardrobe department or your subject can prevent hours of audio problems.
Concealment Tools That Actually Reduce Rustle
Beyond the triangle method, there are specialized products designed specifically to isolate lavalier microphones from clothing. These tools are what professional sound mixers carry in their kits every day.
The Moleskin Sandwich Technique
Moleskin is a cotton fabric with an adhesive backing, originally used for blister prevention. Sound mixers have adopted it as one of the most effective rustle-reduction tools available. The technique is called the moleskin sandwich because the microphone is literally pressed between two layers of moleskin.
To build a moleskin sandwich, cut two strips of moleskin about two inches long and half an inch wide. Place the mic capsule between the two strips, sticky sides facing each other, so the capsule is fully enclosed except for the sound port. Then tape the entire sandwich to the inside of the garment.
The soft cotton surface of the moleskin creates a smooth barrier between the mic and the fabric. When the garment moves, it slides against the moleskin rather than the hard surface of the capsule. Working professionals on forums like r/LocationSound consistently recommend this as one of the most reliable solutions available.
Rycote Undercovers and Stickies
Rycote, the company famous for wind protection products, makes a system specifically designed for concealed lavalier mounting. Their Stickies are soft adhesive pads that hold the mic capsule, and Undercovers are fabric covers that go over the top to create a smooth surface.
The system works similarly to the moleskin sandwich but is pre-manufactured for consistent results. The advantage is convenience: you do not need to cut custom shapes or carry bulk rolls of moleskin. The disadvantage is cost, as the pads are single-use and need regular replacement.
Many broadcast sound departments keep Rycote Undercovers in their standard kit. They are particularly popular for fast-paced news and corporate work where you need to mic someone quickly and reliably.
Gaffer Tape vs Medical Tape
Both gaffer tape and medical tape work for lavalier concealment, but they serve slightly different purposes. Gaffer tape is stronger and holds more securely, which makes it ideal for active scenes where the performer is moving a lot. The cloth backing also provides some friction reduction.
Medical tape (like 3M Micropore or Transpore) is gentler on skin and easier to remove without leaving residue. It is the better choice for skin placement or for use on delicate wardrobe. Some sound mixters carry both and choose based on the situation.
Avoid packing tape, masking tape, and scotch tape. These materials do not conform well to body contours, they leave residue, and they can damage wardrobe permanently.
Joeys Sticky Stuff and Similar Adhesives
Joeys Sticky Stuff is a tacky adhesive putty designed for mounting lavalier microphones. You wrap a small amount around the mic capsule and press it into position inside the garment. The putty holds the mic firmly while also creating a soft cushion between the capsule and fabric.
The advantage of tacky adhesives is that they are infinitely repositionable and leave no residue. The downside is that they can lose adhesion in hot environments when talent sweats. They are best used in controlled indoor settings rather than outdoor summer shoots.
Similar products include Hibaclamp and various generic mounting putties. All work on the same principle of creating a conformable, non-rigid mount for the capsule.
Can You Fix Clothing Rustle in Post-Production?
Prevention is always better than the cure, but what happens when you are already in the edit room with rustle-damaged audio? Post-production tools have improved dramatically, but they still have real limitations.
Why Prevention Is Always Better
Clothing rustle is not a consistent noise like a hum or a hiss. It is a dynamic, intermittent sound that varies in frequency, volume, and character. This makes it extremely difficult for noise reduction algorithms to distinguish from the dialogue you want to keep.
When a rustle event overlaps with a syllable of speech, you are forced to choose between leaving the noise or cutting into the voice. Most of the time, you end up with a compromise that satisfies no one. The dialogue sounds processed and the rustle is still audible underneath.
This is why every professional sound mixer will tell you: spend the extra five minutes on set to tape the mic properly. It will save you hours in post and produce a better result.
Tools That Can Help
iZotope RX is the industry standard for audio repair, and its De-rustle module is specifically designed for clothing noise. It works by analyzing the spectral content of the rustle and creating a signature that it can then reduce across the clip. For mild to moderate rustle, it can produce acceptable results.
Adobe Audition and Premiere Pro both have spectral editing tools that let you visually identify and paint out rustle events. This is a manual, time-consuming process, but for isolated incidents (like a single bad rustle during an otherwise clean sentence), it can be effective.
Izotope Dialogue Isolate is another useful tool that uses machine learning to separate speech from background noise. It can reduce the severity of rustle but tends to introduce artifacts when pushed hard. Use it gently and always compare against the original.
The Limitations of Post-Production Noise Reduction
No software can fully remove severe clothing rustle without degrading dialogue quality. The more aggressive your noise reduction settings, the more the voice takes on a watery, robotic quality that listeners immediately notice. This is called artifacting, and it is the telltale sign of over-processed audio.
Severe rustle that covers multiple words or entire sentences is generally unfixable. In those cases, the best option is ADR (automated dialogue replacement), where the performer re-records their lines in a studio and you lip-sync the replacement audio to the picture.
Treat post-production noise reduction as a safety net, not a strategy. If you are counting on software to save your audio, you are setting yourself up for disappointment. The best post-production approach is the one you never need to use.
FAQs
How do I stop my lav mic from rustling?
To stop lav mic clothing rustle, use the triangle method with gaffer tape to create a protective pocket around the capsule so fabric never touches it directly. You can also use a moleskin sandwich, Rycote Undercovers, or tape the mic directly to skin. Choosing natural fabrics like cotton and wool over synthetic materials like polyester makes a significant difference.
Can you remove clothing rustle from lav mic audio in post-production?
You can reduce mild to moderate clothing rustle using tools like iZotope RX De-rustle module or spectral editing in Adobe Audition. However, severe rustle that overlaps with dialogue is extremely difficult to remove without degrading voice quality. Prevention on set is always more effective than fixing it later.
Do lavalier mics work well under clothes?
Yes, lavalier mics are designed to work under clothing and are widely used hidden inside shirts, blouses, and jackets. The key is isolating the capsule from moving fabric using tape, moleskin, or specialized concealers. With proper technique, hidden lav mics can produce broadcast-quality audio.
What are the most common issues with wireless lavalier mics?
The most common issues with wireless lavalier mics are clothing rustle from fabric friction, RF interference from other wireless devices, signal dropout when the transmitter and receiver lose line of sight, battery failure during long shoots, and cable noise from the wire between capsule and transmitter. Proper placement and cable management address most of these problems.
Should I tape my lav mic to skin or clothing?
Skin placement eliminates fabric-on-capsule friction entirely and generally produces the cleanest audio. However, it requires adhesive tape on the body, which may not be comfortable or practical for all talent. Clothing placement is faster and more comfortable but requires proper concealment techniques like the triangle method to prevent rustle. Choose based on your shoot requirements.
Final Thoughts on Lavalier Mic Clothing Rustle
Clothing rustle happens because lavalier microphones are extremely sensitive and fabric friction produces acoustic energy in the exact range those mics are built to capture. Understanding this dynamic is the first step toward eliminating the problem.
The techniques in this guide, from the triangle method to the moleskin sandwich to choosing the right fabrics, are proven solutions used by working professionals every day. Start with prevention: ask talent to wear natural fabrics, take five extra minutes to tape the mic properly, and test for rustle before you start recording.
When you understand why your lavalier mic picks up so much clothing rustle, you stop fighting the microphone and start working with the physics of sound. That is the difference between audio you have to fix and audio you can use straight from the recording.