
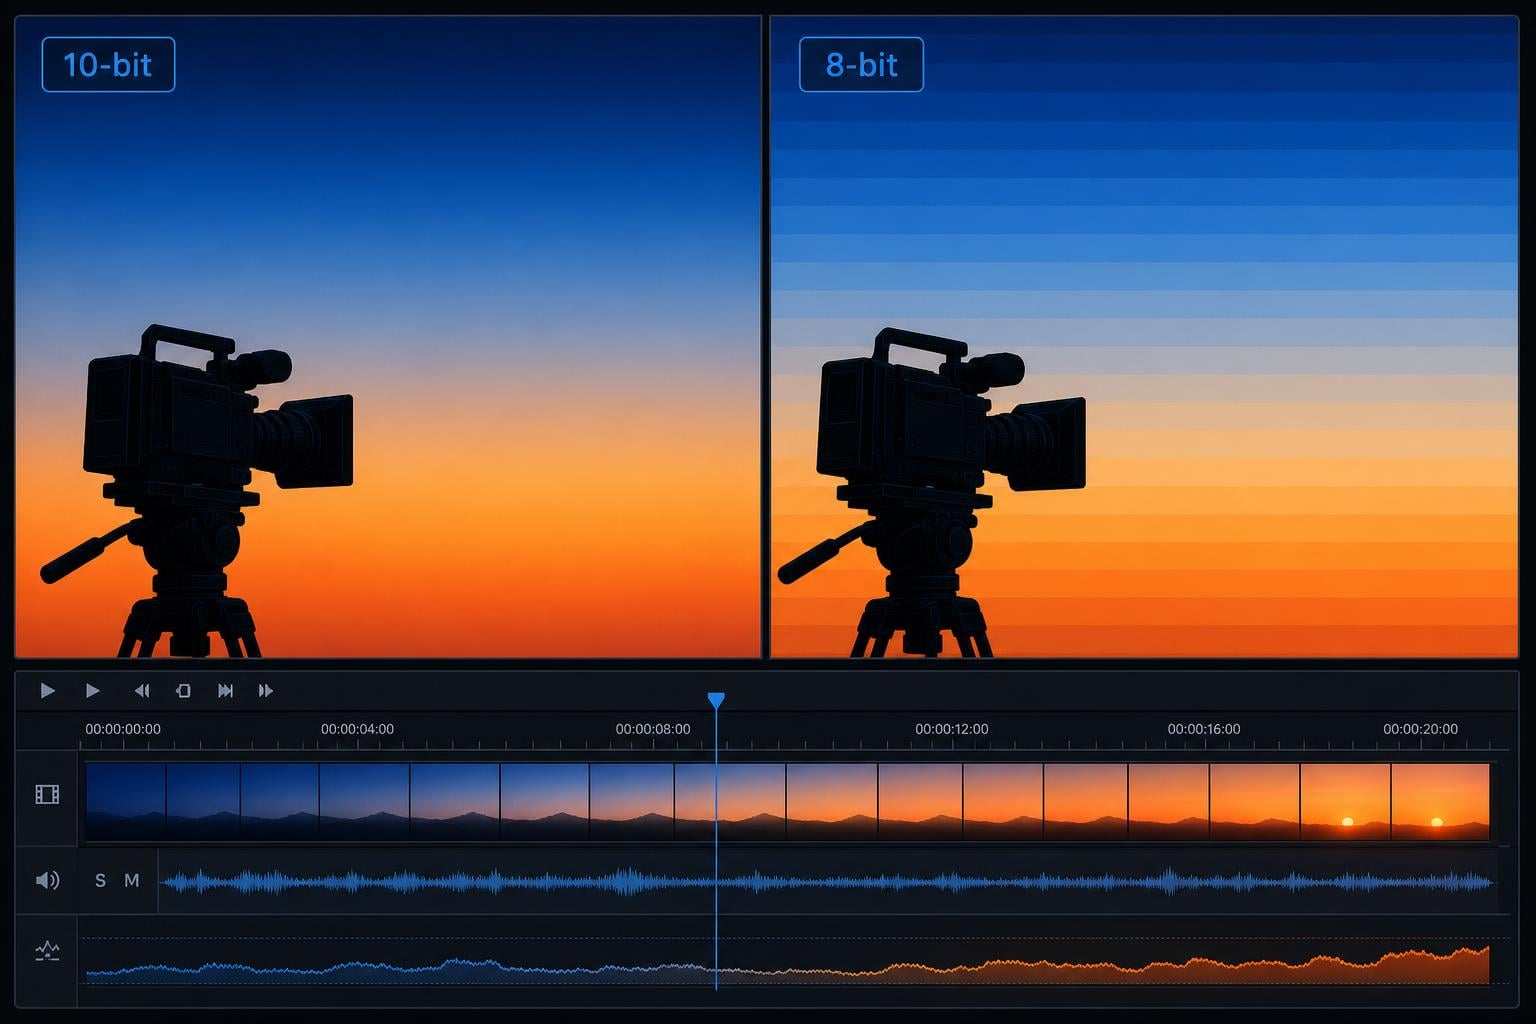
You just shot the perfect golden hour scene. The sky is a gorgeous gradient from warm orange to deep blue. Back in your editing suite, you push the exposure slightly and suddenly the sky breaks into ugly stepped bands of color instead of a smooth transition. If this has happened to you, you have already experienced the practical reality of 8-bit vs 10-bit video.
The difference between 8-bit and 10-bit video sounds like a technical spec debate for engineers. In reality, it is the single most impactful setting on your camera when it comes to how much you can manipulate your footage in post-production. Our team has spent years testing cameras across different bit depths, and the results might surprise you.
Whether you are a vlogger, a colorist, or somewhere in between, understanding bit depth changes how you approach every shoot. It affects which camera settings you use, which codecs you record in, how aggressively you can grade, and whether your final output looks clean or falls apart under scrutiny.
In this guide, we break down exactly what bit depth means, why 8-bit vs 10-bit video matters for everything from YouTube uploads to professional filmmaking, and how to decide which one you actually need for your work in 2026. We cover the technical fundamentals, practical examples, real-world test results from working videographers, and a clear decision framework you can apply to your next project.
Table of Contents
Quick Summary: 8-Bit vs 10-Bit Video at a Glance
Here is the short version for anyone who needs a fast answer. The core distinction between 8-bit and 10-bit video comes down to how many color values each pixel can hold, and that number directly determines how much room you have for post-production adjustments.
8-bit video records 256 levels per color channel, producing about 16.7 million total colors. It is the standard for most consumer cameras, web video, and social media delivery.
10-bit video records 1,024 levels per channel, producing over 1.07 billion total colors. This gives you exponentially smoother gradients and far more room for color grading.
The visible difference shows up most in smooth gradients like skies, heavy color grading pushes, log profile workflows, and HDR content delivery.
For social media and casual shooting, 8-bit is generally sufficient and saves significant storage space.
For professional work, log footage, and heavy grading, 10-bit is strongly recommended to avoid banding artifacts and preserve image quality during editing.
The total color jump from 8-bit to 10-bit is a factor of 64, meaning 10-bit captures 64 times more color data than 8-bit.
Chroma subsampling (4:2:0 vs 4:2:2 vs 4:4:4) works alongside bit depth and compounds its effect. A 10-bit 4:2:2 recording gives you both more levels and higher color resolution.
HDR delivery requires 10-bit as a technical specification. There is no HDR in 8-bit.
If you are shooting straightforward content with minimal color correction and delivering to YouTube or social media, 8-bit will serve you well. If you plan to shoot log profiles, grade heavily, work with green screens, or produce HDR content, 10-bit video is the difference between smooth footage and visible artifacts that you cannot fix.
What Is Bit Depth? The Foundation of Video Color
Bit depth is the number that tells you how many distinct color values a single pixel can represent. Think of it as the resolution of your color, separate from the spatial resolution of your image. Just as higher megapixel counts give you more detail in your image, higher bit depth gives you more detail in your color transitions.
Every pixel in a digital video image is made up of three color channels: red, green, and blue. The bit depth determines how many steps of brightness each of those channels can record. More steps means finer control over each color, which means smoother transitions between similar shades.
The math is exponential. Each bit doubles the number of available values. An 8-bit channel gives you 2 to the 8th power, which is 256 levels. A 10-bit channel gives you 2 to the 10th power, which is 1,024 levels. That does not sound like a massive jump until you multiply across all three RGB channels.
For 8-bit video, you multiply 256 x 256 x 256 to get approximately 16.7 million total possible colors. For 10-bit, you multiply 1,024 x 1,024 x 1,024 to get over 1.07 billion colors. That is a 64x increase in the total number of color values the camera can record.
This is why bit depth matters so much for video quality. It is not about producing colors that are more vivid or saturated. A deeper red is still the same red in both 8-bit and 10-bit. The difference is about producing finer, more granular steps between colors. And those fine steps are exactly what prevent the ugly banding artifacts that ruin smooth gradients.
Think of it like a staircase. An 8-bit staircase has 256 steps from the bottom to the top. Each step is relatively tall, and you can clearly see where one step ends and the next begins. A 10-bit staircase has 1,024 steps over the same height. Each step is much shorter, and the transitions become nearly invisible. This is exactly how bit depth affects color transitions in your video.
An analogy we use with our team is the difference between a JPEG and a RAW photo. A JPEG file compresses to 8-bit color, which is fine for display but limits your editing flexibility. A RAW file captures 12, 14, or even 16 bits of color data, giving you enormous latitude to adjust exposure, white balance, and color in post. The same principle applies to video: more bits means more editing freedom.
8-Bit Video: 16.7 Million Colors and Its Limitations
8-bit video has been the consumer standard for decades. Most phones, entry-level cameras, web cameras, and streaming platforms default to 8-bit color. And for good reason: 16.7 million colors is a lot of color information, and the infrastructure for capturing, editing, and distributing 8-bit video is universal.
The human eye can distinguish somewhere between 1 million and 10 million colors under ideal conditions. So 16.7 million total colors sounds like it should be more than enough. And for many use cases, it genuinely is. The problem is not the total number of colors available but how those colors are distributed across the tonal range.
Where 8-bit runs into trouble is the distribution of those colors. With only 256 levels per channel, the steps between adjacent shades are relatively coarse. In areas of an image with very gradual color transitions, like a clear sky or a softly lit wall, you can start to see distinct bands where the color jumps from one value to the next.
This becomes dramatically worse when you start manipulating the footage. Push the exposure, stretch the contrast, or apply a log profile correction, and those 256 levels get spread even thinner. What was a barely noticeable step in-camera becomes a visible stripe in your edit. The more you push, the worse it gets.
For standard dynamic range shooting with minimal grading, 8-bit is perfectly fine. Straight-to-social content, event coverage, talking head videos, and casual vlogs will look great in 8-bit. The problem only emerges when you ask those 256 levels to do heavy lifting in post-production.
There is also a delivery consideration. Most web platforms, including YouTube, Vimeo, and social media networks, encode their final output in 8-bit. Even if you deliver a 10-bit master file, the platform will downconvert it for distribution. This means that the visible advantage of 10-bit can be partially negated by platform compression, especially for casual content viewed on phones.
However, this does not mean 10-bit is wasted for web delivery. Recording in 10-bit still gives you better source material to work with. You can grade more aggressively, fix more problems, and achieve more creative looks before encoding the final delivery file. The platform may display in 8-bit, but a 10-bit master that has been properly graded will produce a better 8-bit output than an 8-bit master that was pushed to its limits.
10-Bit Video: Over 1 Billion Colors and Why It Matters
10-bit video multiplies your color data by a factor of 64 compared to 8-bit. Those 1,024 levels per channel give you color transitions so fine that the steps between adjacent shades become effectively invisible to the human eye under normal viewing conditions.
In practical terms, this means smooth gradients stay smooth. A clear blue sky renders as a seamless wash of color rather than stepped bands. Skin tone transitions look natural and continuous. Soft lighting falloff preserves its organic quality instead of breaking into posterized stripes. The difference is immediately visible in challenging scenes.
But the real advantage of 10-bit video is not how it looks straight out of the camera. It is how much punishment it can take in post-production before showing damage. With four times the levels per channel, you can push exposure, stretch contrast, shift white balance, and apply creative grades far more aggressively before artifacts appear. This is the core argument for 10-bit recording.
This is why professional filmmakers, colorists, and anyone shooting log profiles consider 10-bit a minimum requirement. Log gamma profiles compress the entire dynamic range of the scene into a flat, low-contrast image that must be heavily manipulated in post to look correct. Doing that manipulation with only 256 levels per channel is asking for trouble.
Modern mirrorless cameras from Sony, Panasonic, Fujifilm, Canon, and Nikon increasingly offer internal 10-bit recording. What used to require an external recorder like an Atomos Ninja is now available in-camera on many models. This has made 10-bit more accessible than ever for independent creators and has dramatically lowered the barrier to professional-quality workflows.
Some cameras offer 10-bit recording only in specific codecs or resolutions. For example, a camera might record 10-bit internally only when using H.265, or only when shooting 4K rather than 1080p. Always check your camera specifications carefully to understand exactly which combinations of resolution, frame rate, codec, and bit depth are available.
It is also worth noting that not all 10-bit implementations are equal. A 10-bit H.265 file at 400 Mbps contains more information than a 10-bit H.265 file at 100 Mbps. Bit depth tells you how many color levels each pixel can hold, but bitrate tells you how much data per second the codec allocates to storing those levels. Both matter for final image quality.
Color Banding: The Silent Quality Killer
Color banding is the most visible symptom of insufficient bit depth. It appears as visible stripes or steps in areas of an image that should have a smooth, continuous gradient. Once you learn to spot it, you will see it everywhere in 8-bit footage, especially after any kind of post-production manipulation.
The classic banding scenario is a clear blue sky. The transition from deep blue at the top of the frame to lighter blue near the horizon should be perfectly smooth. In 8-bit video, especially after any color grading, that gradient often breaks into visible concentric bands of slightly different blue. Each band represents a jump from one brightness level to the next.
Smooth walls, soft shadows, and gradient lighting setups are also prime candidates for banding. Any time a large area of your frame has a very gradual color transition, the limited steps of 8-bit become visible. This is particularly common in interior shots with mixed lighting, where color temperature gradients can stretch across entire walls.
Compression makes the problem significantly worse. When your 8-bit footage gets encoded with H.264 or H.265 for delivery, the compression algorithm can amplify existing banding artifacts. YouTube’s compression is particularly aggressive, and uploading 8-bit footage that has been heavily graded can result in visible banding even if your edited master looked clean on your monitor.
Skin tones are another area where banding rears its head. In 8-bit footage, subtle transitions between highlight and shadow areas on a face can break into posterized zones. This is especially noticeable in side-lit portraits or scenes with mixed color temperatures. Ten-bit footage maintains the smooth, continuous tonal transitions that make skin look natural and three-dimensional.
One forum user we tracked, Dave Baker, put it bluntly: he found 10-bit worth it specifically to avoid banding in clear blue skies when shooting log profiles. This is one of the most common pain points among working videographers, and it is directly caused by insufficient bit depth. When you shoot a flat log profile and then expand it back to normal contrast, the sky gradient that was borderline acceptable in-camera becomes unusable.
Banding is also cumulative across your processing chain. If you shoot 8-bit, apply a LUT, do a primary grade, add a secondary correction, and then encode for delivery, each step introduces a small amount of additional quantization. In 10-bit, the finer color steps provide a buffer against this accumulation, keeping your final output clean even after multiple processing stages.
Color Grading: Where 10-Bit Truly Shines
The true test of bit depth is not how your footage looks straight out of the camera. It is how much you can manipulate it in post-production before the image starts to fall apart. This is where the rubber meets the road for the 8-bit vs 10-bit debate.
Color grading is where 10-bit video earns its keep. With 1,024 levels per channel to work with, you can make aggressive adjustments to exposure, contrast, white balance, and color without introducing artifacts. Push a sky darker by two stops? No problem. Shift the entire color temperature of a scene? The gradient holds. Crush the blacks for a moody look? The shadows stay clean.
Try the same adjustments on 8-bit footage and the results are very different. Those 256 levels per channel get stretched and remapped, and the gaps between adjacent values widen. Smooth gradients start showing steps. Shadow detail gets crushed into indistinguishable blocks. Highlight areas blow out unpredictably. The footage fights back against every adjustment you make.
Andrew Smith, a contributor to a well-known DV forum discussion on this topic, described the feeling perfectly. He said the real difference is how much you can manipulate the color before you run out of depth to work with. Working with 8-bit eventually feels like working with mud. That description captures the experience better than any spec sheet. You reach a point where every adjustment degrades the image instead of improving it.
Log gamma profiles are the ultimate stress test for bit depth. Profiles like Sony S-Log3, Panasonic V-Log, Canon C-Log, and Fujifilm F-Log compress the entire dynamic range into a flat, desaturated image. Restoring that image to a natural-looking result requires significant contrast and saturation adjustments. In 8-bit, those adjustments eat through your available color data rapidly. In 10-bit, you have plenty of headroom.
Shadow detail recovery is particularly sensitive to bit depth. Lifting underexposed shadows in 8-bit footage often reveals noise, banding, and color shifts. The same adjustment in 10-bit preserves clean, continuous tonal information because there are four times as many discrete levels between black and the shadow midtones. This means you can save underexposed shots that would be unrecoverable in 8-bit.
Highlight recovery works the same way. When you need to pull back blown highlights or recover detail from bright areas, 10-bit footage has more discrete values in the upper tonal range to work with. The transitions from near-white to textured highlight areas remain smooth and detailed instead of breaking into harsh digital clipping.
Creative look development also benefits enormously from 10-bit. When you are building a specific color palette for a film or commercial, you may need to make extreme hue shifts, split-tone shadows and highlights independently, or apply selective color adjustments. All of these operations stretch and remap color data, and 10-bit gives you the headroom to execute creative visions without technical compromise.
Chroma Subsampling Explained: 4:2:0 vs 4:2:2 vs 4:4:4
Bit depth does not work alone. Its partner in crime is chroma subsampling, and understanding both together is essential for making informed decisions about your video settings. Chroma subsampling determines how much color resolution your video retains, while bit depth determines how many levels each color sample can hold.
Chroma subsampling is a compression technique that reduces color data by sampling color information at lower resolution than brightness information. The human eye is more sensitive to brightness detail than color detail, so this trade-off is largely invisible under normal viewing conditions. It is one of the most effective compression strategies in all of video technology.
The notation looks like 4:2:0, 4:2:2, or 4:4:4. The first number always refers to the luminance (brightness) sampling width. The second and third numbers describe how many color difference samples are taken in each row of pixels. This J:a:b notation system has been used since the early days of digital television.
4:4:4 means every pixel gets full color information. This is the gold standard but produces enormous file sizes. It is typically reserved for high-end cinema cameras, CGI rendering, and professional post-production workflows where maximum color fidelity is essential.
4:2:2 means color is sampled at half the horizontal resolution of brightness. For every two pixels sharing a horizontal pair, one color sample is shared. This provides excellent color accuracy for grading and keying while keeping file sizes manageable. Professional cameras and external recorders commonly use 4:2:2, and it is the sweet spot for most professional video work.
4:2:0 means color is sampled at half resolution both horizontally and vertically. For every four pixels arranged in a 2×2 block, one color sample is shared. This is the standard for most consumer video, H.264 and H.265 delivery codecs, Blu-ray discs, and most internal camera recording at lower bit depths.
Why does this matter for bit depth? Because the two factors multiply. An 8-bit 4:2:0 recording is the most compressed common format, with both limited color levels and reduced color resolution. A 10-bit 4:2:2 recording gives you both more color levels and higher color resolution. The combination provides the maximum flexibility for post-production work.
For green screen work and text-heavy content, chroma subsampling matters enormously. Color keying requires clean, accurate color data at every pixel to produce clean edges around your subject. 4:2:0 footage produces jagged edges and color bleeding around keyed subjects because the color information is shared across four pixels. Moving to 4:2:2, especially in 10-bit, dramatically improves keying quality and edge accuracy.
The interaction between bit depth and chroma subsampling is important to understand. A 10-bit 4:2:0 file has 1,024 levels per channel but only samples color at quarter resolution. A 10-bit 4:2:2 file has the same 1,024 levels but samples color at half resolution. For grading work, both are useful, but the 4:2:2 version will produce cleaner results when you need to make localized color adjustments.
Log Gamma and Dynamic Range: Why 10-Bit Is Essential
Log gamma profiles are designed to capture the maximum dynamic range from your camera sensor. They do this by applying a logarithmic curve that compresses highlights and shadows into a flat, low-contrast image. The result looks washed out and unnatural straight out of the camera, but it contains far more tonal information than a standard recorded image.
The trade-off is that log footage requires significant post-production work to look correct. You need to apply a conversion LUT or manually rebuild the contrast and color. This process stretches and remaps the tonal values in your footage, and that is exactly where bit depth becomes critical. Log encoding is the scenario where bit depth matters most.
In 8-bit, the limited 256 levels per channel are already stretched thin by the log encoding. The log curve allocates more values to the midtones and fewer to the extremes, which means the highlights and shadows are working with even fewer than 256 levels. When you then expand that footage back to a normal contrast curve, the gaps between adjacent values widen further. The result is banding in skies, posterization in skin tones, and unstable color in the shadows.
In 10-bit, the log encoding has 1,024 levels per channel to work with. Even after the conversion curve is applied, there are enough discrete values to maintain smooth gradients throughout the image. This is why every professional colorist will tell you that 10-bit is the minimum for serious log workflows. Without it, the log profile is capturing wide dynamic range that you cannot actually use cleanly.
Common log profiles include Sony S-Log2 and S-Log3, Panasonic V-Log, Canon C-Log and C-Log3, Fujifilm F-Log, and Nikon N-Log. Each has its own characteristics and optimal exposure strategies, but all of them demand higher bit depth to deliver clean results. If your camera offers an internal log profile, it almost certainly also offers or requires 10-bit recording to make that log usable in post.
Dynamic range and bit depth are related but distinct concepts. Dynamic range is the total range from the darkest shadow to the brightest highlight your sensor can capture. Bit depth is how finely that range is divided into discrete steps. A camera with wide dynamic range but low bit depth produces footage with large gaps between tonal values. That footage will show banding when graded, even though the raw dynamic range data was captured.
This is why some cameras with impressive dynamic range numbers can still produce disappointing results. A 14-stop dynamic range sensor recording to 8-bit video captures all that range but then chops it into only 256 steps per channel. The wide range is there, but the resolution of that range is too coarse to be useful for aggressive grading. Ten-bit recording gives you the fine steps needed to actually exploit your sensor’s full dynamic range.
8-Bit + FRC and Dithering: Clever Workarounds
Not every display or camera that claims 10-bit performance is truly 10-bit native. A technique called Frame Rate Control, or FRC, is used to simulate higher bit depth on 8-bit panels and sensors. This creates a gray area in product specifications that can confuse buyers.
FRC works by rapidly cycling pixels between adjacent brightness levels. If a pixel needs to display a value that falls between level 128 and level 129, FRC alternates between those two values at high speed. Your eye perceives an intermediate value that does not actually exist in the panel’s native color depth. The effect relies on temporal averaging in the human visual system.
An 8-bit display with FRC can simulate approximately 10-bit color depth. This is sometimes marketed as 8-bit + FRC, 8-bit (10-bit), or even just 10-bit, which can be confusing for consumers. A true 10-bit native display or sensor processes and stores 1,024 discrete values per channel without any temporal dithering tricks. The difference between simulated and native 10-bit is most visible in static images and during careful grading work.
Dithering is a related technique used in software and compression. It works by adding controlled noise to an image to break up visible banding. The noise fills in the gaps between discrete color steps, making stepped gradients appear smoother. Many professional video applications apply dithering automatically during color depth conversion or compression, and it can be added manually in grading software.
How effective are these workarounds? For display purposes, 8-bit + FRC panels can look very close to true 10-bit under most viewing conditions. The temporal dithering is fast enough that most viewers cannot distinguish it from native 10-bit output. For critical color evaluation work, however, true 10-bit native panels are measurably more accurate.
For recording and grading purposes, there is no substitute for true 10-bit data. FRC and dithering can mask symptoms of insufficient bit depth, but they cannot add color information that was never captured. An 8-bit recording with dithering applied may look slightly better than one without, but it will never match the grading flexibility of a true 10-bit recording. Dithering fills gaps in display, not gaps in data.
If you are evaluating monitors for color grading work, check whether the panel is 8-bit + FRC or true 10-bit native. For critical grading work, especially on HDR content, a true 10-bit native panel is strongly recommended. For general viewing and basic editing, 8-bit + FRC displays are typically adequate and significantly less expensive.
HDR, Storage, and File Size: The Practical Trade-Offs
HDR content delivery requires 10-bit video. This is not a recommendation or a best practice. It is a technical requirement of the HDR10, HDR10+, and Dolby Vision specifications. If you plan to produce HDR content for streaming platforms, modern televisions, or HDR-compatible mobile devices, you need 10-bit recording. There is no workaround.
The reason is straightforward. HDR expands the dynamic range and color gamut of your content beyond what standard dynamic range can represent. That expanded range requires more discrete values to cover without banding. Eight-bit simply does not have enough levels to represent the wider tonal range of HDR content smoothly. The specifications enforce 10-bit minimum to prevent exactly the kind of banding that would undermine the HDR experience.
Ten-bit does come with practical trade-offs, and storage is the most immediate one. Ten-bit video files are larger than their 8-bit equivalents, sometimes significantly so. The exact increase depends on the codec and compression settings, but you should expect files roughly 25 to 50 percent larger when moving from 8-bit to 10-bit at the same resolution and frame rate.
If you also upgrade from 4:2:0 to 4:2:2 chroma subsampling alongside the bit depth increase, file sizes can double or more. A camera that records 8-bit 4:2:0 internally at 100 Mbps might require 200 Mbps or higher for 10-bit 4:2:2, which translates directly to more storage cards, more hard drive space, and faster computers for editing.
Codec choice matters significantly here. H.265 (also known as HEVC) is more efficient than H.264 at the same quality level, which helps offset the increased data of 10-bit recording. A 10-bit H.265 file can be similar in size to an 8-bit H.264 file at comparable quality. ProRes formats are commonly used for editing due to their balance of quality and playback performance, but ProRes files are substantially larger than compressed delivery formats.
ProRes 422 HQ at 4K 24fps requires approximately 70 GB per hour. ProRes 422 standard requires about half that. Compare this to H.265 at 100 Mbps, which produces roughly 45 GB per hour. Your choice of codec and bit depth together determines your storage requirements, and both should be planned before a shoot begins.
For creators working with limited storage budgets, the practical question is whether the quality improvement justifies the storage cost. For social media delivery at 1080p, the answer is often no. For professional work that will be graded, archived, or delivered in 4K HDR, the storage overhead is simply a cost of doing business. Plan for it in your budget and workflow from day one.
Computer performance is another consideration. Editing 10-bit 4K footage in ProRes or H.265 requires a capable processor, sufficient RAM, and ideally a dedicated GPU. Older machines may struggle with real-time playback of 10-bit timelines, forcing you to use proxy workflows or lower-resolution previews. Factor hardware requirements into your decision to move to 10-bit production.
8-Bit vs 10-Bit Video: Who Actually Needs the Upgrade?
The answer to whether you need 10-bit video depends entirely on what you shoot and how you deliver it. Here is a practical decision framework based on real-world use cases and the workflows we have tested across our team.
You are fine with 8-bit if: You shoot standard dynamic range profiles and deliver to social media platforms. You do minimal color correction beyond basic exposure and white balance adjustments. Your subjects are people talking, products being shown, or events being documented. Your final output is 1080p for YouTube or social media, and your viewers watch on phones. In these scenarios, the compression applied by delivery platforms will mask any subtle banding, and your audience will never see the difference.
You should strongly consider 10-bit if: You shoot any log gamma profile. You do significant color grading or creative looks. Your footage contains smooth gradients like skies, walls, or product backgrounds. You shoot green screen or chroma key work. You deliver in 4K and want your footage to hold up under scrutiny on larger screens. The jump to 10-bit in these scenarios will be immediately noticeable in your editing flexibility.
You absolutely need 10-bit if: You are producing professional content for clients. You shoot HDR content. You work as a colorist or do extensive creative grading. You shoot narrative films, documentaries, or commercials where image quality directly affects your livelihood. You shoot log profiles and need maximum flexibility in post-production. In these cases, 8-bit is a professional liability that will eventually cost you a shot or a client.
Beyond cameras, 10-bit color depth matters for gaming monitors and phone screens as well. Many modern displays advertise 10-bit color, and high-end gaming monitors use 10-bit panels to deliver smoother gradients and better HDR performance. For competitive gaming, the difference is negligible. For immersive single-player experiences and HDR gaming, a true 10-bit display provides visibly smoother gradients and more natural color transitions.
Phone screens have also adopted higher bit depths. Premium smartphones from Apple, Samsung, and Google now feature displays capable of showing 10-bit color depth. Whether the content you view actually takes advantage of this depends on the source material, but the hardware is ready. As more streaming platforms deliver HDR content to mobile devices, 10-bit screens will become increasingly relevant.
For content creators, the question of whether to shoot 10-bit for YouTube deserves special attention. YouTube’s compression is aggressive and can introduce banding even in 10-bit source material. However, delivering a properly graded 10-bit master gives YouTube’s encoder better source data to work with. The result is typically cleaner output than delivering from an 8-bit master that has already been pushed to its limits.
Our practical recommendation is to shoot 10-bit whenever your camera offers it and your storage allows. There is no downside to having more color data available, even if your final delivery does not take full advantage of it. You can always throw away data in post-production, but you can never add it back.
Real-World Testing: Can You Actually See the Difference?
This is where the debate gets interesting, and where real-world experience sometimes contradicts the spec sheets. Forum discussions reveal a community divided on whether 10-bit is always worth the upgrade. The honest answer is that it depends, and pretending otherwise does a disservice to creators trying to make informed decisions.
One of the most detailed side-by-side tests we found comes from a DV Info Net forum user named Anil Dasari. Using a Canon EOS-R, he conducted a comparison with three configurations: 8-bit 4:2:0 internal H.264, 8-bit 4:2:2 ProRes recorded externally via an Atomos Ninja, and 10-bit 4:2:2 ProRes recorded externally. This is about as controlled a real-world comparison as you can get outside of a lab.
His surprising finding was that he could not see any visible difference between the 8-bit and 10-bit external ProRes recordings after applying identical grades to both. The ProRes codec stores all data in a 10-bit container regardless of the source bit depth, which may partially explain this result. The internal 8-bit H.264 footage showed the expected limitations, but the external recordings were nearly indistinguishable even under careful scrutiny.
This does not mean 10-bit is a myth. It means that the visible difference depends heavily on your specific workflow, shooting conditions, and delivery format. Under moderate grading on standard scenes, the difference may be completely invisible to any viewer. Under aggressive grading on challenging scenes with smooth gradients and wide dynamic range, the difference becomes obvious and undeniable.
An important caveat flagged by forum users is that some NLEs (non-linear editing systems) still process certain operations internally at 8-bit, even when fed 10-bit footage. If your editing software rounds down to 8-bit during processing, some of the benefit of 10-bit recording is silently lost. Check your NLE documentation to confirm that your workflow maintains 10-bit precision throughout the processing pipeline. This is a frequently overlooked factor in the debate.
Rainer Listing, another forum contributor, offered a valuable warning against gear acquisition syndrome. Technology alone will not improve your content. Shooting in 10-bit will not make a boring video interesting or a poorly lit scene look professional. The investment in 10-bit gear pays off only when paired with the skills, lighting knowledge, and post-production workflows that take advantage of the additional data. Buying a 10-bit camera and shooting auto-everything in standard mode wastes the capability entirely.
Our recommendation based on the accumulated evidence is pragmatic. If your current camera shoots only 8-bit, do not rush to upgrade solely for bit depth. Focus on lighting, composition, and storytelling first. Those fundamentals will improve your work more than any bit depth upgrade ever could. When you do upgrade for other reasons, make 10-bit internal recording a priority feature. It gives you a safety net for challenging scenes and more creative freedom in post-production that you will learn to rely on.
For those who want to test the difference themselves, try this simple experiment. Shoot the same scene in both 8-bit and 10-bit, then apply identical aggressive grades to both. Look specifically at smooth gradient areas like skies and walls. The 8-bit version will almost certainly show banding before the 10-bit version does. That visible difference is the practical case for 10-bit recording.
FAQs
Is 10bit better than 8bit video?
Yes, 10-bit video is objectively better than 8-bit in terms of color data. It records 1,024 levels per channel (over 1 billion total colors) compared to 8-bit’s 256 levels per channel (16.7 million colors). This means smoother gradients, less banding, and significantly more flexibility for color grading. However, whether you will actually see the difference depends on your shooting style, grading intensity, and delivery platform.
Is a 10-bit video necessary?
10-bit video is necessary if you shoot log profiles, do extensive color grading, produce HDR content, work with green screens, or deliver professional work for clients. It is not necessary for casual social media content, talking head videos, or footage with minimal post-production. For vlogs, event coverage, and direct-to-platform delivery, 8-bit is perfectly sufficient.
Which is better, 8bit or 10bit?
10-bit is technically superior because it captures 64 times more color data than 8-bit. However, better depends on your needs. For professional filmmaking, color grading, log workflows, and HDR, 10-bit is clearly better. For social media vlogs and minimal-grading content, 8-bit offers smaller file sizes with no visible quality loss after platform compression.
Is 1080p 10bit better than 1080p?
Yes, 1080p 10-bit is better than 1080p 8-bit when it comes to color accuracy, gradient smoothness, and post-production flexibility. Bit depth and resolution are independent qualities. A 1080p 10-bit image has the same spatial resolution as a 1080p 8-bit image but contains 64 times more color data per pixel. If you plan to grade your footage, the 10-bit version will hold up far better.
The Bottom Line on Bit Depth
The 8-bit vs 10-bit video debate is not about specs on a page. It is about how much creative freedom you have in post-production and whether your footage can survive the journey from camera to viewer without falling apart.
Eight-bit video remains the workhorse format for casual content, social media delivery, and situations where minimal grading is needed. Sixteen million colors is more than enough when your workflow is straightforward and your delivery platform compresses the output anyway.
Ten-bit video is the professional standard for anyone who pushes their footage in post. It provides the headroom needed for log workflows, creative grading, HDR delivery, and challenging scenes with smooth gradients. The over one billion colors it captures are not about producing more vivid images. They are about giving you the latitude to shape your image without introducing artifacts.
Our advice is simple. Assess your actual workflow honestly. If you shoot log and grade heavily, you need 10-bit. If you shoot standard profiles for social media, 8-bit will serve you well and save you storage. Either way, understanding the difference between 8-bit vs 10-bit video puts you in control of your image quality in a way that no camera upgrade alone can match.